Redis – Setup a Test Cluster in Ubuntu

I have been working with Redis lately and in my local development environment I was just testing against a single node setup of Redis. However, this did not give me the functionality I wanted to test against since our production environment uses a Redis cluster of six nodes.

Connecting to a Redis cluster requires a different configuration from a single Redis instance and is also functionally different. For example, a standard six node cluster of Redis is actually three pairs of Master-Replica where each pair stores a third of the data. So for those reasons I really wanted to test my application setup against a Redis cluster in my local development environment, which was Ubuntu.

Note: At the the time of this post I was using Ubuntu 16.04 and Redis 4.0.9.

So here is how to spin up a six node test cluster of Redis on a single Ubuntu instance.

Download and Build Redis

wget http://download.redis.io/releases/redis-4.0.9.tar.gz
tar -zxvf redis-4.0.9.tar.gz
cd redis-4.0.9
make

Create Six Redis Nodes

First, edit the create-cluster startup file:

cd utils/create-cluster
vi create-cluster

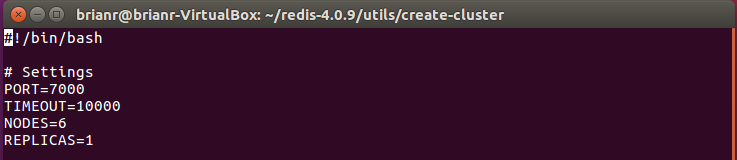
In my setup, I changed the following:

  • Port – set to 7000 (This will be the starting port)
  • Timeout – set to 10000 (I found this handy in my dev enivornment)
  • Nodes – set to 6 (We use a 6 node cluster in production, so I wanted the same)
  • Replicas – set to 1 (This means each master with have one replica, 6 nodes = 3 Masters and 3 Replicas)
Edit_Create_Cluster_Script

Now we can start all six nodes:

./create-cluster start

You will see the nodes have been started:
Redis-Start-Cluster

If you do an “ls” in the folder you will notice that some files have been created:

  • Each node has a log file (For example: 7001.log)
  • Each node has a cluster configuration file (For example: nodes-7001.conf)
Cluster_config_files

You can also confirm the nodes are running by connecting to a node using the “redis-cli” command line tool by specifying the port of a node:

cd redis-4.0.9/src
./redis-cli -p 7001
Redis-Cli-Cluster-Key-Added

Join the Nodes as a Cluster

Even though at this stage we have six Redis nodes, they know nothing about each other. So the next step is to join these nodes as a cluster.

Prerequisites: Ruby and Redis Gem

The script that connects the nodes as a cluster is written in Ruby and requires the Redis Gem, which requires Ruby 2.2.2 or higher.

Update Ruby

sudo apt-get install ruby-full

Install Redis Gem

sudo gem install redis

Create the Cluster

To create a cluster where you only need to connect to it from the local machine you can use:

cd redis-4.0.9/src
./redis-trib.rb create --replicas 1 127.0.0.1:7001 127.0.0.1:7002 127.0.0.1:7003 127.0.0.1:7004 127.0.0.1:7005 127.0.0.1:7006

NOTE: If you plan to connect to your Redis cluster remotely, you will need to use the public IP of the machine instead of 127.0.0.1.

When you run the join cluster script it will show you the generated configuration and then ask you to confirm the setup:
Redis-Join-Nodes-To-Cluster_001

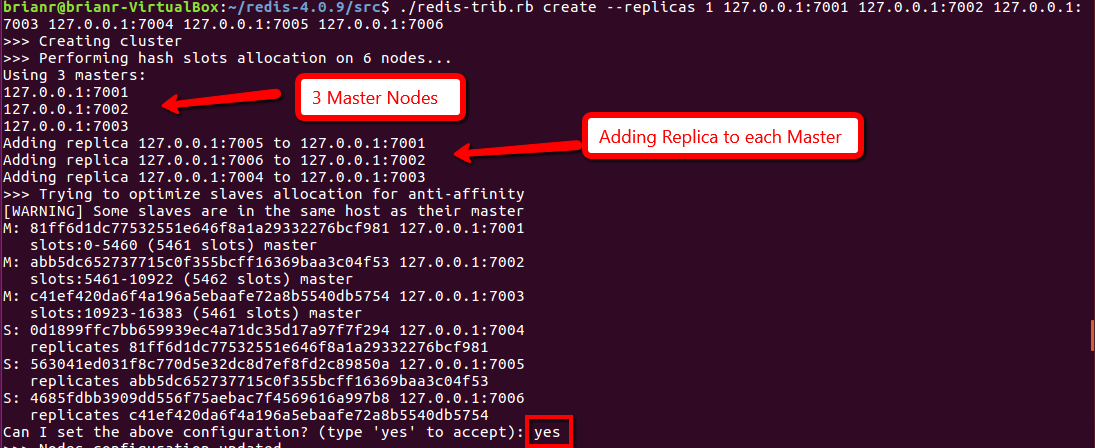
After you answer “yes” and press enter, the nodes will be joined in a cluster. If you see the following the cluster creation was successful:
Redis-Join-Nodes-Success

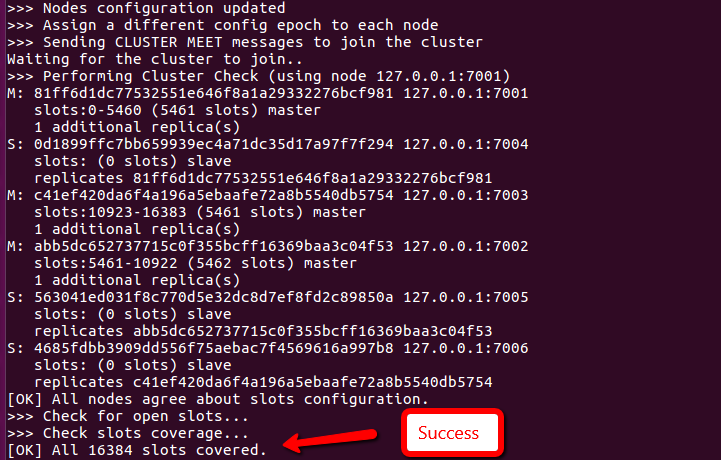
You now have a functional Redis Cluster that you can connect to from your application!

For more information on Redis Clusters I recommend reading the Redis Cluster Tutorial.

I hope that helps!

VirtualBox – Resize a CentOS Virtual Drive

Recently I created a CentOS (Version 7) VM using VirtualBox for some development work I was doing, but foolishly I set the virtual disk to the default size of 8 gigs, figuring it would be easy to resize it later.

Well, after piecing together bits of information from several places I was finally able to get my virtual disk resized as well as my CentOS partition that was on it. Here are the steps that worked for me!

Expand VirtualBox Drive

The first thing you need to do is expand your virtual drive which I did using the VBoxmanage command line tool provided by VirtualBox (reference).

Note: Ensure virtual box root folder is on your path (e.g., C:\Program Files\Oracle\VirtualBox).

Resize the drive with the command VBoxmanage to the desired size in megabytes (e.g., here I am resizing the drive to 20 gigs):

VBoxmanage modifyhd MyCentosDisk.vdi --resize 20000

Resize Partition with GParted

Download the gparted live cd.

Attach the gparted live cd as a drive to your virtual machine and make it the “Primary Master”.

Note: Ensure the checkbox “Live CD” is selected when you add the CD drive.

Now start your VM.

The gparted UI will load. Now resize the parition by expanding it to use the available free space on the virtual disk.

Shutdown your VM, remove the gparted live cd drive and set your virtual disk to once again be the “Primary Master” drive.

However, after you restart your VM you will notice that CentOS is still not aware of the additional space:

df -h

Expand CentOS Partition

Now you will need to expand your Linux partition to use the free space on the drive.

First check the sizes of the current partitions and get the name:

vgdisplay -v

On my system the name of the partition to expand was “/dev/centos/root”.

Extend the volume with the available free space:

lvextend -l +100%FREE /dev/centos/root

Now you are ready to perform the online resize:

xfs_growfs /dev/centos/root

NOTE: resize2fs works on other distributions of Linux but not on CentoOS, so you must use xfs_growfs (reference).

I hope that helps!

Jetty – Setup Jetty on CentOS 7

I recently setup Jetty on a CentOS 7 Linux server. Previously we had been running Jetty in a windows environment but now we are moving our servers over to Linux. Here are my setup notes, I hope they help!

Install JDK

Note: We are using the Oracle JDK (Not openJDK). Check for the latest version of JDK 1.8.

Download and install the JDK:

wget --no-cookies --no-check-certificate --header "Cookie: oraclelicense=accept-securebackup-cookie" "http://download.oracle.com/otn-pub/java/jdk/8u111-b14/jdk-8u111-linux-x64.rpm" -O /opt/jdk-8-linux-x64.rpm

yum install /opt/jdk-8-linux-x64.rpm

Set JAVA_HOME and add it to your PATH:

Create a file in /etc/profile.d to store java settings:

sudo touch /etc/profile.d/java.sh

vi /etc/profile.d/java.sh
Add the lines:

export JAVA_HOME=/usr/java/latest
export PATH=$JAVA_HOME/bin:$PATH

Install Jetty Web Server

Note: Check for the latest version of Jetty.

Download and install Jetty:

wget http://central.maven.org/maven2/org/eclipse/jetty/jetty-distribution/9.3.14.v20161028/jetty-distribution-9.3.14.v20161028.tar.gz

tar -zxvf jetty-distribution-9.3.14.v20161028.tar.gz

mv jetty-distribution-9.3.14.v20161028 /opt/jetty-9.3.14

ln -s /opt/jetty-9.3.14 /opt/jetty

Note: creating a soft link for your /opt/jetty install will be very useful later when you want to upgrade your version of Jetty. All you will need to do to upgrade is just download the tar.gz of the newest version, unpack it, and point the soft link to the new folder.

Create a temp folder for Jetty to unpack war files:

mkdir /opt/temp

Create webappbase folder where your apps will run:

mkdir /opt/webappbase

Move start.ini and webapps into the webappbase folder:

mv /opt/jetty/webapps /opt/webappbase/webapps

mv /opt/jetty/start.ini /opt/webappbase

Create a “jetty” user that Jetty will run under:

useradd -m jetty

Update files and folders to be owned by “jetty” user:

chown -RH jetty:jetty /opt/jetty

chown -R jetty:jetty /opt/webappbase

chown -R jetty:jetty /opt/temp

Configure Jetty Web Server

Setup Jetty as a service:

ln -s /opt/jetty/bin/jetty.sh /etc/init.d/jetty

Add the new Jetty service to be managed by chkconfig:

chkconfig --add jetty

Set Jetty service to run on startup for the following run levels:

chkconfig --level 345 jetty on

Create a jetty settings file:

sudo touch /etc/default/jetty

You will need to set TMPDIR, JETTY_BASE, and JETTY_HOME. Also, any JAVA_OPTIONS you need to set can be set in the settings file for your Jetty server.

Add jetty settings by editing the jetty default settings file:
vi /etc/default/jetty

TMPDIR=/opt/temp

JETTY_BASE=/opt/webappbase

JETTY_HOME=/opt/jetty

JETTY_USER=jetty

export JAVA_OPTIONS="-Xms128m -Xmx2048m -server -XX:+UseConcMarkSweepGC -XX:+CMSClassUnloadingEnabled"

If you want to change the default port number, you can do so by editing the start.ini file:
vi /opt/webappbase/start.ini

# Replace
# jetty.http.port=8080
# With
jetty.http.port=8081

Start Jetty Server

Switch to the “root” user, then start the Jetty service:

sudo su
service jetty start

Verify the service has started successfully:

service jetty status

Test that the server is running:

curl localhost:8081

Deploy a War file

To deploy an application to Jetty, all you need to do is copy a WAR file to the folder:

/opt/webappbase/webapps

That’s all!

Linux – How to ssh between two linux computers without needing a password

Having to constantly type in your password on a linux server that you ssh to often can get to be an annoyance. Luckily this is an easy problem to solve. Since I always end up forgetting how to do this setup, I thought I would finally write this down, even if just for my own reference :).

1. ssh to server1

Connect to server1 and generate a public/private key pair.

 
ssh myusername@server1
password:
ssh-keygen -t rsa

When you run this command you will be prompted to answer several questions. Just hit enter each time until you are returned to a prompt.

Generating public/private rsa key pair.
Enter file in which to save the key (/home/local/myusername/.ssh/id_rsa): 
Created directory '/home/local/myusername/.ssh'.
Enter passphrase (empty for no passphrase): 
Enter same passphrase again: 
Your identification has been saved in /home/local/myusername/.ssh/id_rsa.
Your public key has been saved in /home/local/myusername/.ssh/id_rsa.pub.
The key fingerprint is:
15:68:47:67:0d:40:e1:7c:9a:1c:25:18:be:ab:f1:3a myusername@server1
The key's randomart image is:
+--[ RSA 2048]----+
|        .*Bo=o   |
|       .+o.*  .  |
|       ...= .    |
|         + =     |
|        S +      |
|         .       |
|      . .        |
|      E+         |
|      oo.        |
+-----------------+

Now you will need to copy the public key you just generated and save it somewhere, you will need it later. Also ensure when you copy the key that the text is all on one line, if there are line breaks in the text, it will cause problems later when you try and use the key.

cd .ssh
cat id_rsa.pub
ssh-rsa AAAAB3NzaC1yc2EAAAABIwAAAQEAyFS7YkakcjdyCDOKpE4RrBecRUWShgmwWnxhbVNHmDtJtK
PqdiLcsVG5PO94hv3A0QqlB1MX33vnP6HzPPS7L4Bq+5plSTyNHiDBIqmZqVVxRbRUKbP44BaA9RsW2ROu
8qdzmXRPupkyFBBOLa23RJJojBieFGygR2OwjS8cq0kpZh1I3c1fbU9I5j38baUK0naTBe2v7s/C8allnJ
hwkfds+Q9/kjaV55pMZIh+9jhoA8acCA6B55DYrgPSycW6fEyV/1PIER+a5lOXp1QCn0U+XFTb85dp5fW0
/rUnu0F9nBJFlo7Rvc1cMuSUiul/wvJ8tzlOhU8FUlHvHqoUUw== myusername@server1

2. ssh to server2

Now we will copy the public key from server1 to server2.

ssh myusername@server2
password:
mkdir .ssh
cd .ssh
vi authorized_keys
# paste the public key
chmod 600 authorized_keys

3. Test that your setup is working

ssh myusername@server1
password:
ssh myusername@server2
# you should not be prompted for a password!

That is all! (Thanks Dave!)