Java – Using Jackson JsonGenerator to write JSON to an OutputStream

We had a REST API call that was causing a lot of overhead for a client application due to the number of requests it needed to make. We wanted to add a new REST API call that could return multiple items in a single request, however we did not want to cause memory pressure on the server by loading everything into memory first, then returning it. Instead we wanted to be able to stream the JSON results to an output stream as each item was read. For this task we decided to use the Jackson JsonGenerator.

You can download the example project from GitHub here.

If you are using Maven, you can add the Jackson dependency to your pom.xml file:

<dependency>
   <groupId>com.fasterxml.jackson.core</groupId>
   <artifactId>jackson-core</artifactId>
   <version>2.11.1</version>
</dependency>

The following class PrintOutputStreamRunnable is just to show the current state of the OutputStream as we write data to it using JsonGenerator.

import java.io.ByteArrayOutputStream;

public class PrintOutputStreamRunnable implements Runnable {

    private final ByteArrayOutputStream outputStream;
    private boolean isRunning;

    public PrintOutputStreamRunnable(ByteArrayOutputStream outputStream) {
        this.outputStream = outputStream;
        this.isRunning = true;
    }

    @Override
    public void run() {

        try {
            String result = "";
            while (isRunning) {
                if (!result.equals(outputStream.toString())) {
                    result = outputStream.toString();
                    System.out.println(result);
                }
            }
        } catch (Exception e) {
            e.printStackTrace();
        }
    }

    public void stop() {
        this.isRunning = false;
    }
}

Now the following class JsonGeneratorExample has our JsonGenerator example code. Note how after adding each chunk of JSON we call the flush() command to flush the JSON in the buffer to the OutputStream.

import com.fasterxml.jackson.core.JsonEncoding;
import com.fasterxml.jackson.core.JsonFactory;
import com.fasterxml.jackson.core.JsonGenerator;

import java.io.ByteArrayOutputStream;

public class JsonGeneratorExample {
    public static void main(String[] args) throws Exception {

        // Create the OutputStream we will be writing JSON to
        ByteArrayOutputStream outputStream = new ByteArrayOutputStream();

        // Create a background thread to print out the contents of the OutputStream
        PrintOutputStreamRunnable runnable = new PrintOutputStreamRunnable(outputStream);
        Thread thread = new Thread(runnable);
        thread.start();

        // Create the JsonGenerator to write to our OutputStream
        JsonFactory factory = new JsonFactory();
        JsonGenerator generator = factory.createGenerator(outputStream, JsonEncoding.UTF8);

        generator.writeStartObject();

        generator.writeArrayFieldStart("cars");

        generator.writeStartObject();
        generator.writeStringField("make", "Mercedes");
        generator.writeStringField("model", "C300");
        generator.writeNumberField("doors", 4);
        generator.writeEndObject();
        generator.flush();  // Flush buffered JSON to the output stream
        Thread.sleep(1000);

        generator.writeStartObject();
        generator.writeStringField("make", "Ford");
        generator.writeStringField("model", "Focus");
        generator.writeNumberField("doors", 2);
        generator.writeEndObject();
        generator.flush();  // Flush buffered JSON to the output stream
        Thread.sleep(1000);

        generator.writeStartObject();
        generator.writeStringField("make", "Infiniti");
        generator.writeStringField("model", "G35");
        generator.writeNumberField("doors", 4);
        generator.writeEndObject();
        generator.flush();  // Flush buffered JSON to the output stream
        Thread.sleep(1000);

        generator.writeEndArray();

        generator.writeEndObject();

        generator.close();

        outputStream.close();

        runnable.stop();

    }

}

If you are using Maven from the command line you can run the following commands:

  • mvn compile
  • mvn exec:java -Dexec.mainClass=”JsonGeneratorExample”

The output here shows the state of the OutputStream after each chunk of JSON is flushed:

{"cars":[{"make":"Mercedes","model":"C300","doors":4}
{"cars":[{"make":"Mercedes","model":"C300","doors":4},{"make":"Ford","model":"Focus","doors":2}
{"cars":[{"make":"Mercedes","model":"C300","doors":4},{"make":"Ford","model":"Focus","doors":2},{"make":"Infiniti","model":"G35","doors":4}
{"cars":[{"make":"Mercedes","model":"C300","doors":4},{"make":"Ford","model":"Focus","doors":2},{"make":"Infiniti","model":"G35","doors":4}]}

As you can see in the output, each time we call the flush() command the JSON in the buffer is written to the OutputStream.

I hope that helps!
Java – Simple CompletableFuture Example

Recently I was working on improving the performance of some code that does regular imports of data over a REST API. I thought a simple change would be to move the calls that were currently done sequentially to being done in parallel using a Java CompletableFuture.

The co-worker I was pairing with at the time had never used a CompletableFuture so I decided to take a quick detour from our task and write a simple standalone example. Once we both had a clear understanding of how to use a CompletableFuture we introduced it into our application. The result was a 3-4 times performance improvement in the runtime of the import job.

You can download the example code at GitHub here.

CompletableFuture Example

The important methods to note on CompletableFuture are:

  • supplyAsync – returns a CompletableFuture running an asynchronous task
  • join – waits for asynchronous task to complete and returns result

The class ItemGateway is an example of a class that would take a list of “Ids” to lookup from some external resource, such as a REST API, and wrap each of those calls in a CompletableFuture. In this example we do a Thread.sleep(1000) to simulate the time it would take for each call being made.

import com.google.common.collect.Lists;

import java.util.ArrayList;
import java.util.List;
import java.util.concurrent.CompletableFuture;
import java.util.stream.Collectors;

public class ItemGateway {

    public List<Integer> getItems(List<Integer> items) {

        // Create a CompletableFuture for each item being requested
        // and start each request asynchronously
        List<CompletableFuture<List<Integer>>> futures = items.stream()
                .map(item -> CompletableFuture.supplyAsync(() -> getItem(item)))
                .collect(Collectors.toList());

        // Wait for ALL CompletableFutures to finish then return
        return futures.stream()
                .map(CompletableFuture::join)
                .flatMap(List::stream)
                .collect(Collectors.toList());
    }

    private List<Integer> getItem(Integer item) {
        try {
            // Simulate a call to some external resource
            // by sleeping for a second
            System.out.println("Start: " + item);
            Thread.sleep(1000);
            System.out.println("End: " + item);
            return Lists.newArrayList(item);
        } catch (Exception e) {
            e.printStackTrace();
        }
        return new ArrayList<>();
    }

}

Now, lets create a program to run the CompletableFuture by sending a list of 10 items for the ItemGateway to return.

import com.google.common.collect.Lists;

import java.util.List;
import java.util.stream.Collectors;

public class CompletableFuturesExample {

    public static void main(String[] args) {

        List<Integer> items = Lists.newArrayList(1, 2, 3, 4, 5, 6, 7, 8, 9, 10);

        ItemGateway itemGateway = new ItemGateway();

        long startTime = System.currentTimeMillis();

        List<Integer> results = itemGateway.getItems(items);

        System.out.println(String.format("Done in %s ms", (System.currentTimeMillis() - startTime)));

        System.out.println("Results: " + results.stream().map(Object::toString).collect(Collectors.joining(",")));

        System.exit(0);
    }

}

If you are using Maven from the command line you can run the following commands:

  • mvn compile
  • mvn exec:java -Dexec.mainClass=”CompletableFuturesExample”

Notice how even though ItemGateway is doing a Thread.sleep(1000) (1 second) for each of the 10 items being retrieved, the total run time is significantly less than 10 seconds.

Start: 2
Start: 4
Start: 3
Start: 1
Start: 6
Start: 5
Start: 7
Start: 8
Start: 10
Start: 9
End: 3
End: 8
End: 6
End: 10
End: 4
End: 9
End: 1
End: 7
End: 2
End: 5
Done in 1063 ms
Results: 1,2,3,4,5,6,7,8,9,10

Process finished with exit code 0

Note: I ran this example on an 8 core machine, which explains the short run time!

I hope you found this example useful!

References

20 Examples of Using Java’s CompletableFuture

Java – Using SQLServerBulkCopy in Java with an InputStream

Up until recently, the only constructor available in SQLServerBulkCopy took in a file path. This was kind of awkward since if you wanted to use bulk copy with data you had in memory, you either had to write it to a file only to read it back, or extend the class and write a constructor that could take in an InputStream. Luckily in version (I think 6.3) Microsoft finally added a new constructor with support for InputStream.

The following is a simple example in Java showing how to use SQLServerBulkCopy to write to a table in SQL Server.

You can download the example code from GitHub here.

Prerequisites

If you already have SQL server, great! However, if you do not you can download and install SQL Express.

Create Database and Table

The first thing we will do is create the database and user the Java application will use:

USE master;
GO
CREATE LOGIN client WITH PASSWORD = 'client';
GO
CREATE DATABASE Examples;
GO
USE Examples;
GO
create user client for login client;
GO
Grant ALL to client;
GO
EXEC sp_addrolemember 'db_owner', 'client';
GO

Now create the table we will be use for our bulk copy example:

CREATE TABLE [dbo].[SqlBulkInsertExample](
    [Id] [int] NOT NULL,
    [Name] [varchar](100) NOT NULL
) ON [PRIMARY]
GO

Java Bulk Copy Example

Create a Java project. If using Maven, you can add the following dependency to your pom.xml file:

<dependency>
    <groupId>com.microsoft.sqlserver</groupId>
    <artifactId>mssql-jdbc</artifactId>
    <version>8.2.2.jre8</version>
</dependency>

Here is a simple Java example application showing how to take some data, convert it to a CSV, and save it to the database using bulk insert:

package com.yardi.lobos.scheduling.domain;

import com.microsoft.sqlserver.jdbc.SQLServerBulkCSVFileRecord;
import com.microsoft.sqlserver.jdbc.SQLServerBulkCopy;
import com.microsoft.sqlserver.jdbc.SQLServerBulkCopyOptions;

import java.io.ByteArrayInputStream;
import java.io.InputStream;
import java.nio.charset.StandardCharsets;
import java.sql.Connection;
import java.sql.DriverManager;
import java.sql.Types;
import java.util.HashMap;
import java.util.Map;

public class SqlBulkCopyExample {

  private static String JDBC_URL = "jdbc:sqlserver://localhost;instanceName=SQLEXPRESS;DatabaseName=Examples";
  private static String USERNAME = "client";
  private static String PASSWORD = "client";
  private static String TABLE_NAME = "dbo.SqlBulkInsertExample";

  public static void main(String[] args) {
    try {
      // Create some data to insert into our database table
      Map data = new HashMap();
      data.put(1, "John Smith");
      data.put(2, "Steve Smith");
      data.put(3, "Molly Smith");

      // We are going to build a CSV document to use for the bulk insert
      StringBuilder stringBuilder = new StringBuilder();

      // Add table column names to CSV
      stringBuilder.append("id, name\n");

      // Copy data from map and append to CSV
      for (Map.Entry entry : data.entrySet()) {
        stringBuilder.append(
            String.format("%s,%s\n", entry.getKey(), entry.getValue()));
      }

      byte[] bytes = stringBuilder.toString().getBytes(StandardCharsets.UTF_8);
      try (InputStream inputStream = new ByteArrayInputStream(bytes)) {

        // Pass in input stream and set column information
        SQLServerBulkCSVFileRecord fileRecord = new SQLServerBulkCSVFileRecord(
            inputStream, StandardCharsets.UTF_8.name(), ",", true);

        fileRecord.addColumnMetadata(1, "id", Types.INTEGER, 0, 0);
        fileRecord.addColumnMetadata(2, "name", Types.VARCHAR, 0, 0);

        try (Connection connection = DriverManager.getConnection(
            JDBC_URL, USERNAME, PASSWORD)) {

          // Set bulk insert options, for example here I am setting a batch size
          SQLServerBulkCopyOptions copyOptions = new SQLServerBulkCopyOptions();
          copyOptions.setBatchSize(10000);

          // Write the CSV document to the database table
          try (SQLServerBulkCopy bulkCopy = new SQLServerBulkCopy(connection)) {
            bulkCopy.setBulkCopyOptions(copyOptions);
            bulkCopy.setDestinationTableName(TABLE_NAME);
            bulkCopy.writeToServer(fileRecord);
          }
        }
      }
    } catch (Exception e) {
      e.printStackTrace();
    }
  }
}

If you are using Maven from the command line you can run the following commands:

  • mvn compile
  • mvn exec:java -Dexec.mainClass=”SqlBulkCopyExample”

If the program has run successfully you should see:

C:\Users\Brian\Documents\GitHub\SqlBulkCopyExample>mvn exec:java -Dexec.mainClass="SqlBulkCopyExample"
[INFO] Scanning for projects...
[INFO]
[INFO] ---------------< SqlBulkCopyExample:SqlBulkCopyExample >----------------
[INFO] Building SqlBulkCopyExample 1.0-SNAPSHOT
[INFO] --------------------------------[ jar ]---------------------------------
[INFO]
[INFO] --- exec-maven-plugin:3.0.0:java (default-cli) @ SqlBulkCopyExample ---
[INFO] ------------------------------------------------------------------------
[INFO] BUILD SUCCESS
[INFO] ------------------------------------------------------------------------
[INFO] Total time:  1.825 s
[INFO] Finished at: 2018-04-15T18:23:39-06:00
[INFO] ------------------------------------------------------------------------

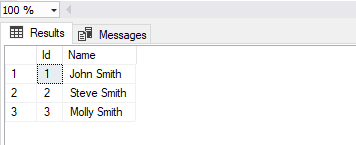
Now if you login to your database and run the following select:

SELECT * FROM dbo.SqlBulkInsertExample

You should see that you have data!
Query_Results

I hope that helps!

Cassandra – Getting Started with Java

Cassandra is a great tool for storing time series data and I happen to be using it on my current project for that exact purpose.

There are several ways to use Cassandra from Java and many ways to improve performance, but here I just want to provide a simple “Getting Started” example. So here it is!

First, download the current version of Cassandra V3 from here.

Second, you can download the example code from GitHub here.

Extract the tar.gz file:

tar -zxvf apache-cassandra-3.11.5-bin.tar.gz

Change directory into the bin folder:

cd apache-cassandra-3.11.5/bin

Start Cassandra on Mac/Linux:

./cassandra -f

If you are using windows, I recommend opening a Powershell window and start Cassandra using:

cassandra.ps1 -f

Create a Java project, if using Maven, you can add the following dependencies to your pom.xml file:

<dependency>
    <groupId>com.datastax.cassandra</groupId>
    <artifactId>cassandra-driver-core</artifactId>
    <version>3.8.0</version>
</dependency>

Here is a simple Java example showing how to connect to Cassandra, create a keyspace, create a table, insert a row, and select a row:

import com.datastax.driver.core.*;
 
import java.time.Instant;
import java.time.ZoneId;
import java.util.Date;
import java.util.UUID;
 
public class CassandraV3Tutorial {
 
    private final static String KEYSPACE_NAME = "example_keyspace";
    private final static String REPLICATION_STRATEGY = "SimpleStrategy";
    private final static int REPLICATION_FACTOR = 1;
    private final static String TABLE_NAME = "example_table";
 
    public static void main(String[] args) {
 
        // Setup a cluster to your local instance of Cassandra
        Cluster cluster = Cluster.builder()
                .addContactPoint("localhost")
                .withPort(9042)
                .build();
 
        // Create a session to communicate with Cassandra
        Session session = cluster.connect();
 
        // Create a new Keyspace (database) in Cassandra
        String createKeyspace = String.format(
                "CREATE KEYSPACE IF NOT EXISTS %s WITH replication = " +
                        "{'class':'%s','replication_factor':%s};",
                KEYSPACE_NAME,
                REPLICATION_STRATEGY,
                REPLICATION_FACTOR
        );
        session.execute(createKeyspace);
 
        // Create a new table in our Keyspace
        String createTable = String.format(
                "CREATE TABLE IF NOT EXISTS %s.%s " + "" +
                        "(id uuid, timestamp timestamp, value double, " +
                        "PRIMARY KEY (id, timestamp)) " +
                        "WITH CLUSTERING ORDER BY (timestamp ASC);",
                KEYSPACE_NAME,
                TABLE_NAME
        );
        session.execute(createTable);
 
        // Create an insert statement to add a new item to our table
        PreparedStatement insertPrepared = session.prepare(String.format(
                "INSERT INTO %s.%s (id, timestamp, value) values (?, ?, ?)",
                KEYSPACE_NAME,
                TABLE_NAME
        ));
 
        // Some example data to insert
        UUID id = UUID.fromString("1e4d26ed-922a-4bd2-85cb-6357b202eda8");
        Date timestamp = Date.from(Instant.parse("2018-01-01T01:01:01.000Z"));
        double value = 123.45;
 
        // Bind the data to the insert statement and execute it
        BoundStatement insertBound = insertPrepared.bind(id, timestamp, value);
        session.execute(insertBound);
 
        // Create a select statement to retrieve the item we just inserted
        PreparedStatement selectPrepared = session.prepare(String.format(
                "SELECT id, timestamp, value FROM %s.%s WHERE id = ?",
                KEYSPACE_NAME,
                TABLE_NAME));
 
        // Bind the id to the select statement and execute it
        BoundStatement selectBound = selectPrepared.bind(id);
        ResultSet resultSet = session.execute(selectBound);
 
        // Print the retrieved data
        resultSet.forEach(row -> System.out.println(
                String.format("Id: %s, Timestamp: %s, Value: %s",
                row.getUUID("id"),
                row.getTimestamp("timestamp").toInstant().atZone(ZoneId.of("UTC")),
                row.getDouble("value"))));
 
        // Close session and disconnect from cluster
        session.close();
        cluster.close();
    }
}

If you would like to look at the data in your local Cassandra database, you can use the CQLSH command line tool.

So from the bin folder type:

./cqlsh

This will take you to a “cqlsh>” prompt:

Connected to Test Cluster at 127.0.0.1:9042.
[cqlsh 5.0.1 | Cassandra 3.11.5 | CQL spec 3.4.4 | Native protocol v4]
Use HELP for help.
cqlsh>

To view all available Keyspaces:

DESCRIBE KEYSPACES;

You will now see our “example_keyspace” in the list:

cqlsh> DESCRIBE KEYSPACES;

system_schema  system    system_traces
system_auth    system_distributed    example_keyspace

To switch to that Keyspace:

USE example_keyspace;
cqlsh> USE example_keyspace;
cqlsh:example_keyspace>

To show all tables in the keyspace:

DESCRIBE TABLES;

You should see the new table “example_table”:

cqlsh:example_keyspace> DESCRIBE TABLES;

example_table

Now from the command line you can view the data in the table by using a select statement:

SELECT * FROM example_table;

Which will show the following information:

id                                    | timestamp                       | value
--------------------------------------+---------------------------------+-------
1e4d26ed-922a-4bd2-85cb-6357b202eda8 | 2018-01-01 01:01:01.000000+0000 | 123.45

I hope that helps!

Note: The documentation on the DataStax website is very good.

Java – Simple GZIP Utility to Compress and Decompress a String

I wanted to have a simple utility class in our app so we could easily compress a String to a byte[] when our REST API received a GET request with the header “Accept-Encoding: gzip” and also be able to decompress a byte[] to a String when we received a PUT with the header “Content-Encoding: gzip”. So I wrote a simple utility class to GZIP a String to a byte[] and to unzip a GZIP byte[] to a String.

You can download the code from GitHub here.

So here is a simple GzipUtil class:

import java.io.*;
import java.nio.charset.StandardCharsets;
import java.util.zip.GZIPInputStream;
import java.util.zip.GZIPOutputStream;
 
public class GzipUtil {
 
  public static byte[] zip(final String str) {
    if ((str == null) || (str.length() == 0)) {
      throw new IllegalArgumentException("Cannot zip null or empty string");
    }
 
    try (ByteArrayOutputStream byteArrayOutputStream = new ByteArrayOutputStream()) {
      try (GZIPOutputStream gzipOutputStream = new GZIPOutputStream(byteArrayOutputStream)) {
        gzipOutputStream.write(str.getBytes(StandardCharsets.UTF_8));
      }
      return byteArrayOutputStream.toByteArray();
    } catch(IOException e) {
      throw new RuntimeException("Failed to zip content", e);
    }
  }
 
  public static String unzip(final byte[] compressed) {
    if ((compressed == null) || (compressed.length == 0)) {
      throw new IllegalArgumentException("Cannot unzip null or empty bytes");
    }
    if (!isZipped(compressed)) {
      return new String(compressed);
    }
 
    try (ByteArrayInputStream byteArrayInputStream = new ByteArrayInputStream(compressed)) {
      try (GZIPInputStream gzipInputStream = new GZIPInputStream(byteArrayInputStream)) {
        try (InputStreamReader inputStreamReader = new InputStreamReader(gzipInputStream, StandardCharsets.UTF_8)) {
          try (BufferedReader bufferedReader = new BufferedReader(inputStreamReader)) {
            StringBuilder output = new StringBuilder();
            String line;
            while((line = bufferedReader.readLine()) != null){
              output.append(line);
            }
            return output.toString();
          }
        }
      }
    } catch(IOException e) {
      throw new RuntimeException("Failed to unzip content", e);
    }
  }
 
  public static boolean isZipped(final byte[] compressed) {
    return (compressed[0] == (byte) (GZIPInputStream.GZIP_MAGIC)) 
           && (compressed[1] == (byte) (GZIPInputStream.GZIP_MAGIC >> 8));
  }
}

Also here are a set of JUnit tests for this utility:

import org.junit.Test;
import static org.junit.Assert.*;
 
public class GzipUtilTest {
 
  @Test(expected = IllegalArgumentException.class)
  public void zip_shouldThrowIllegalArgumentException_whenStringToCompressIsNull() {
    GzipUtil.zip(null);
  }
 
  @Test(expected = IllegalArgumentException.class)
  public void zip_shouldThrowIllegalArgumentException_whenStringToCompressIsEmpty() {
    GzipUtil.zip("");
  }
 
  @Test
  public void zip_shouldGzipString_whenStringIsNotEmpty() {
    String xml = "<Hello>World</Hello>";
 
    byte[] actual = GzipUtil.zip(xml);
 
    assertTrue(GzipUtil.isZipped(actual));
  }
 
  @Test(expected = IllegalArgumentException.class)
  public void unzip_shouldThrowIllegalArgumentException_whenByteArrayToDecompressIsNull() {
    GzipUtil.unzip(null);
  }
 
  @Test(expected = IllegalArgumentException.class)
  public void unzip_shouldThrowIllegalArgumentException_whenByteArrayToDecompressIsEmpty() {
    GzipUtil.unzip(new byte[0]);
  }
 
  @Test
  public void unzip_shouldReturnInputByteArrayAsString_whenByteArrayContentIsNotGzipped() {
    String xml = "<Hello>World</Hello>";
    byte[] bytes = xml.getBytes();
 
    String actual = GzipUtil.unzip(bytes);
 
    assertEquals(xml, actual);
  }
 
  @Test
  public void unzip_shouldDecompressByteArrayGzippedContent() throws Exception {
    String xml = "<Hello>World</Hello>";
    byte[] compressed = GzipUtil.zip(xml);
 
    String actual = GzipUtil.unzip(compressed);
 
    assertEquals(xml, actual);
  }
 
  @Test
  public void isZipped_shouldReturnFalse_whenContentIsNotGzipped() {
    byte[] bytes = new byte[] {1,2,3};
 
    boolean actual = GzipUtil.isZipped(bytes);
 
    assertFalse(actual);
  }
 
  @Test
  public void isZipped_shouldReturnTrue_whenContentIsGzipped() {
    byte[] bytes = GzipUtil.zip("1,2,3");
 
    boolean actual = GzipUtil.isZipped(bytes);
 
    assertTrue(actual);
  }
}

I hope you find this useful!

Java – Automate database schema updates with Flyway

I am currently working on a Java 8 project which is a REST API deployed as a WAR file to Jetty. Our deploy process is very simple, our deploy pipeline just copies the WAR file into the Jetty directory in each environment then verifies the app is up and running with the correct version and runs some integration tests.

We wanted to be able to apply database migration scripts automatically in each environment (Dev, Test, QA, Staging, Prod) as we did our deploy, so we would no longer have to worry about manually applying scripts. In the past for Java, Scala, and .NET projects I have used several different tools, but for this project we decided to use Flyway which is very flexible and simple to setup.

The documentation for Flyway is excellent, however I decided to just post what we did in our app in case it might help someone else out. Here is our “Quick Start” setup.

1. Add the Flyway dependency

Flyway can be setup using Maven, Gradle, SBT, Ant, etc. In our project we used Maven, so all we did was add the following to our pom.xml file:

<dependency>
<groupId>org.flywaydb</groupId>
<artifactId>flyway-core</artifactId>
<version>3.2.1</version>
</dependency>

2. Code

Now, to get Flyway to check for any database changes to apply, whenever the application is started, put the following code somewhere in your applications startup sequence.

Flyway flyway = new Flyway();
//Create the dbo.schema_version table if it does not already exist
flyway.setBaselineOnMigrate(true);
//Where the method "getDataSource()" provides your DataSource
//object that has the jdbc url, username, and password.
flyway.setDataSource(getDataSource());
flyway.migrate();

3. SQL Script Location

All migrations scripts by default must go in the following folder in your app:

/resources/db/migration

4. SQL Script Naming convention

Scripts are run in version number order based on their names, the default naming convention is:

Version__description.sql
For example: “V1_0_1__create_tables.sql”

All scripts must start with the letter “V”, followed by major/minor version numbers, with two underscores “__” separating the version from the description.

5. Schema Version Table

Flywaydb will automatically create a table in each database called “dbo.schema_version” which stores a log of all migration scripts that have been applied.

The table looks like:

version_rank installed_rank version description type script checksum installed_by installed_on execution_time success
1 1 1 Flyway Baseline BASELINE Flyway Baseline NULL JohnSmith 2015-07-30 15:55:49.337 0 1
1 2 1.0.1 create tables SQL V1_0_1__create_tables.sql -440358290 JohnSmith 2015-07-30 15:55:49.337 109 1

6. Handling Failure

If a script fails, the app will fail to start and the failure information is written to our log files as well as a monitor is tripped. Flywaydb applies each script as a transaction so all changes in the script will be rolled back if any part of the script fails. This is very handy because if you commit a script with some invalid SQL syntax, all you have to do is update the script with the corrected syntax, commit it again, and let the build pipeline apply the changes from the fixed script. No messy cleanup or reset to worry about.

So that is it, you should have all you need to get your database schema changes easily synced up with the deploy of your app!

Java to Sql Server – Cannot create PoolableConnectionFactory

If you are connecting a Java application to a SQL Server database, which is up and running, but your connection fails with the following error:

Could not acquire a connection from DataSource – Cannot create PoolableConnectionFactory

The error is most likely that the windows service “SQL Server Browser” is disabled.

To fix the problem:

  • Start -> Control Panel -> Systems & Security -> Administrative tools -> Services
  • SQL Server Browser -> right click -> properties

image2014-10-30 19-17-34

  • Set Startup type to “Automatic”
  • Apply -> Start

image2014-10-30 19-19-16

Now you should be able to connect to SQL Server from your Java application!

Java – Creating a simple retry command with function passing in Java 8

Recently we have been working on an application that imports data from a number of different sources, where the network connection between us and each of these sources is not very reliable. So in each of our Gateways that makes REST calls to these sources I wanted to be able to write a reusable piece of code that we could use in different calls. So in the event of a failure, the Gateway would retry the command a few more times before finally giving up.

Java 8 uses Functional Interfaces, which are interfaces with a single abstract method. The package java.util.function defines a number of standard functional interfaces, so most of the time you will be able to use one of these. Some example functional interfaces are Function (function with return value and input param), Supplier (function with return value but no input param), and Consumer (function with input param but no return value). However, if one of these standard functional interfaces does not meet your needs you can always define your own. In the following example I use Supplier.

You can get the code from GitHub here.

Retry Command

In Java 8 we create a new class called RetryCommand that has a run method which takes in a function. If the command fails, then the command will be retried until it succeeds or the max retries limit is reached.

import java.util.function.Supplier;

public class RetryCommand<T> {
    private int retryCounter;
    private final int maxRetries;

    public RetryCommand(int maxRetries) {
        this.maxRetries = maxRetries;
    }

    // Takes a function and executes it, if fails, passes the function to the retry command
    public T run(Supplier<T> function) {
        try {
            return function.get();
        } catch (Exception e) {
            return retry(function);
        }
    }

    public int getRetryCounter() {
        return retryCounter;
    }

    private T retry(Supplier<T> function) throws RuntimeException {
        System.out.println("FAILED - Command failed, will be retried " + maxRetries + " times.");
        retryCounter = 0;
        while (retryCounter < maxRetries) {
            try {
                return function.get();
            } catch (Exception ex) {
                retryCounter++;
                System.out.println("FAILED - Command failed on retry " + retryCounter + " of " + maxRetries + " error: " + ex );
                if (retryCounter >= maxRetries) {
                    System.out.println("Max retries exceeded.");
                    break;
                }
            }
        }
        throw new RuntimeException("Command failed on all of " + maxRetries + " retries");
    }
}

The following are some unit tests that demonstrate the functionality of the RetryCommand class:

import org.junit.Test;

import java.util.function.Supplier;

import static org.junit.Assert.*;

public class RetryCommandTest {

    public String SUCCESS = "success";
    public int MAX_RETRIES = 3;

    @Test
    public void run_shouldNotRetryCommand_whenSuccessful() {
        RetryCommand<String> retryCommand = new RetryCommand<>(MAX_RETRIES);
        Supplier<String> commandSucceed = () -> SUCCESS;

        String result = retryCommand.run(commandSucceed);

        assertEquals(SUCCESS, result);
        assertEquals(0, retryCommand.getRetryCounter());
    }

    @Test
    public void run_shouldRetryOnceThenSucceed_whenFailsOnFirstCallButSucceedsOnFirstRetry() {
        RetryCommand<String> retryCommand = new RetryCommand<>(MAX_RETRIES);
        Supplier<String> commandFailOnce = () -> {
            if (retryCommand.getRetryCounter() == 0) throw new RuntimeException("Command Failed");
            else return SUCCESS;
        };

        String result = retryCommand.run(commandFailOnce);

        assertEquals(SUCCESS, result);
        assertEquals(1, retryCommand.getRetryCounter());
    }

    @Test
    public void run_shouldThrowException_whenMaxRetriesIsReached() {
        RetryCommand<String> retryCommand = new RetryCommand<>(MAX_RETRIES);
        Supplier<String> commandFail = () -> {
            throw new RuntimeException("Failed");
        };

        try {
            retryCommand.run(commandFail);
            fail("Should throw exception when max retries is reached");
        } catch (Exception ignored) { }
    }
}

Example Usage

Now let’s create an example showing how we would use this retry command in our code.

First, let’s create a simple dummy RestClient:

public class RestClient {

    public String getThatThing(String id) {
        return id;
    }
}

Second, let’s create a Gateway that calls the RestClient and wraps it in the RetryCommand:

public class MyGateway {
    private RestClient restClient;
    private RetryCommand<String> retryCommand;

    public MyGateway(int maxRetries) {
        retryCommand = new RetryCommand<>(maxRetries);
        restClient = new RestClient();
    }

    public String getThing(final String id) {
        return retryCommand.run(() -> restClient.getThatThing(id));
    }
}

Of course this example is a stripped down version of what we use, which does waits between retries, back off retries, and proper logging of errors, etc. I just wanted to use a retry command as my example code for trying out function passing in Java 8. I hope you found this helpful!

If you are new to Java 8 (just like I am) I recommend reading Everything About Java 8.

MongoDB queries in Java using Conditional Operators

When I first started using MongoDB, I used the interactive shell to learn the query syntax. The syntax is simple and straightforward. However, when I started using the Java driver I was not sure how to translate some of my command line queries into Java code, for example some of the conditional operators like “$in”. The Java documentation on the MongoDB website only showed how to use some basic conditionals like greater than and less than, but not for using other conditionals that use lists like the $in option.

A simple query for all cars with the make “Ford” that match any of several models listed:

SQL:

SELECT * FROM dbo.Cars
WHERE make="Ford"
AND model IN ("Galaxy","Mustang","Meteor")

MongoDB interactive shell:

db.cars.find( { "make":"Ford", "model":{ $in: ["Galaxy","Mustang","Meteor"] } } )

MongoDB Java driver:

BasicDBObject query = new BasicDBObject();
query.put("make", "Ford");
String models[] = new String[]{"Galaxy", "Mustang", "Meteor"};
query.put("model", new BasicDBObject("$in", models));
DBCursor resultsCursor = carsCollection.find(query);

Second Level Caching for Hibernate with Terracotta

Traffic on our system has been increasing, putting more pressure on our database causing the response time of our application to degrade. Since we are currently using Hibernate in our project for a Java app that surfaces a REST API, we decided to look into caching strategies available. After looking around and trying a few technologies we decided to tested out the open source version of Terracotta.

To start let’s just explain the difference between First Level Caching and Second Level Caching in Hibernate.

First-level Cache

First level caching is associated with the Session object and is caching on a per transaction basis. An example would be an object where you make several updates to it as part of a single transaction. Hibernate, rather than submitting several update statements to the database, will pool the group of updates to the object into a single update statement.

Second-level Cache

Second level caching is associated with the SessionFactory object and maintains a cache of previously loaded objects accross transactional boundaries. These cached objects are available to any query for the same object, not just a single transaction. So in this case the entire application has access to retrieve any cached object. For example, if my app performs a lookup for a Product object describing a product, if the application later makes a request for the same product, this object can be retrieved from the Second-level Cache rather than making an additional trip to the database.

Why Terracotta?

Handles asynchronus queueing of writes. This feature offers some failover capabilities for when our database is not available. Originally we attacked the problem separately figuring we needed a caching strategy for reads and a fault tollerant queuing strategy for writes to deal with our current single point of failure (our database). Fortunately Terracotta has functionality that allows us to cover both of these cases.

The Developer Console. This tool allows you to monitor the traffic between your app, the Terracotta server, and your database. With the Developer Console we were able to test out different caching strategies to see which ones gave us the highest percentage of cache hits. For us developers, this was a major plus, having such a useful tool to aid us in tuning our cache settings. It made Terracotta feel much less like a black box.

Simple to install and configure. Since Terracotta just plugs in to Hibernate, there is no real development work required to get it up and running. Setting up a Terracotta server is easy, adding it to the application just meant minor additions to our pom.xml file and our hibernate settings file, and tuning our cache settings was relatively simple using the provided Developer Console.

Install and Start the Terracotta Server

  • Download Terracotta
  • Install by running the command: java -jar terracotta-3.1.0-installer.jar
  • Start the Terracotta server: ~/terracotta/terracotta-3.1.0/bin/start-tc-server.sh
  • Start the developer console: ~/terracotta/terracotta-3.1.0/bin/dev-console.sh

Add Terracotta support to your Maven/Java/Hibernate/Spring Application

  • Add the Terracotta dependencies to your Maven pom.xml file
  • <dependency>
        <artifactId>terracotta-hibernate-agent</artifactId>
        <version>1.0.0</version>
        <groupId>org.terracotta.hibernate</groupId>
        <scope>provided</scope>
    </dependency>
    <dependency>
        <artifactId>terracotta-hibernate-cache</artifactId>
        <version>1.0.0</version>
        <groupId>org.terracotta.hibernate</groupId>
    </dependency>
    
  • Add the following properties to the hibernate properties section of the sessionFactory bean in your Spring database settings file (e.g., app/src/main/resouces/sping/database/database.xml)
  • <bean id="sessionFactory">
        <property name="dataSource" ref="dataSource"/>
        <property name="hibernateProperties">
            <props>
                ...
                <prop key="hibernate.cache.use_second_level_cache">true</prop>
                <prop key="hibernate.cache.provider_class">
                     org.terracotta.hibernate.TerracottaHibernateCacheProvider
                </prop>
                ...
            </props>
        </property>
    ...
    </bean>
    
  • Add a cache annotation to any Hibernate Entity in your application that you wish to have cached: @Cache(usage=CacheConcurrencyStrategy.READ_WRITE)
  • Create a Terracotta cache settings file. This is important because Terracotta by default NEVER evicts an object from cache. Once the memory allocated to Terracotta has been filled, Terracotta will start to write to disk unless eviction settings have been put in place. In the “Resources” folder of your application, create a file called “tc-hibernate-cache.xml”. To create the content for this file you can either look at the Terracotta Hibernate Configuration Reference Guide or use the Developer Console to generate a cache settings file using the GUI tool.

Running your project with Jetty

In our local development environments we use Jetty as our web server (Tomcat on production). To run your app from Maven using the Jetty plugin make sure you first do the following:

  • Set the MAVEN_OPTS environment variable with the “javaagent” parameter
  • export MAVEN_OPTS="-javaagent:/path/to/terracotta-hibernate-agent-1.0.0.jar -cp /path/to/terracotta-hibernate-cache-1.0.0.jar -Xmx512m"
    
  • NOTE: We appended to the MAVEN_OPTS environment variable the value “-Xmx512m” to tell Jetty to use 512mbs (the default is 128). We have found that with an application using Hibernate, 128 makes performance of the application sluggish.
  • Now start the app with the command: mvn jetty:run

Conclusion

Overall we have found Terracotta to be a useful tool. It requires very little effort to update an existing project using Spring/Hibernate to use it. Terracotta offers more than just Second Level Caching, but also handles queuing of writes and ensuring data is written to the SOR (System or Record) in the event the database is not available for a brief period. Also, stale cache entries are not an issue as well since Terracotta updates the cache immediately on any write made to the SOR. As a final note, the Developer Console is a really nice addition!

I hope this post helps!