If you are reading this post it is because you have received the dreaded incompatible_feature_flags error when trying to join an upgraded node or a newly created node to an existing RabbitMQ cluster.
I will describe the scenario that got me into this situation and the solution I used to resolve it.
Scenario
I have a three node RabbitMQ cluster running on CentOS. The existing three nodes are running version 3.8.3, but I wanted to upgrade to version 3.8.14. Now, these two RabbitMQ versions require different versions of Erlang, so Erlang must be upgraded from 22+ to 23+.
When BOTH versions of RabbitMQ use the SAME version of Erlang, the RabbitMQ installer will just do a normal upgrade, carrying forward settings, such as feature flags, cluster configuration, from the previous install.
However, when the version of Erlang needs to be upgraded, you cannot just upgrade RabbitMQ, instead you must:
- Uninstall RabbitMQ
- Upgrade Erlang
- Reinstall RabbitMQ
On a new install of RabbitMQ, it by default enables ALL feature flags.
The documentation does provide you with a config option called forced_feature_flags_on_init to override the list of enabled feature flags, however this option only works if set BEFORE starting RabbitMQ on the node for the very first time. After you have already started RabbitMQ for the first time, it will have no effect.
Here is what you will find in the RabbitMQ documentation on How To Disable Feature Flags:

Also if you try to uninstall and reinstall RabbitMQ thinking that will give you a clean slate, it will not. The uninstall does not remove the local RabbitMQ database which is where the enabled feature flag settings are stored.
So basically I am stuck in this scenario where my existing nodes have the feature flags:

But my upgrade node has the feature flags:

So when I try to join my upgraded node to the cluster I get the error:
[root@node333 ~]# rabbitmqctl stop_app
Stopping rabbit application on node node333@node333 ...
[root@node333 ~]# rabbitmqctl join_cluster node111@node111
Clustering node node333@node333 with node111@node111
Error:
incompatible_feature_flags
But do not worry, I have a solution that worked!
Solution
The following is a step by step solution that worked for me to solve the incompatible feature flags issue.
For this example let’s say we have three nodes:
- node111
- node222
- node333 – This is the node being upgraded
On an Existing Node in the Cluster
Ensure the upgraded node has been removed from the cluster
rabbitmqctl forget_cluster_node <ID of upgraded node>
Get the list of enabled feature flags
rabbitmqctl list_feature_flags
The output should look like:
[root@node111 ~]# rabbitmqctl list_feature_flags
Listing feature flags ...
name state
drop_unroutable_metric disabled
empty_basic_get_metric disabled
implicit_default_bindings enabled
quorum_queue enabled
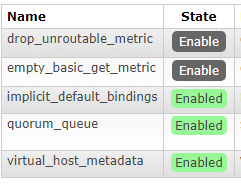
virtual_host_metadata enabledSo out of this list the only feature flags enabled are:
- implicit_default_bindings
- quorum_queue
- virtual_host_metadata
Note: We will need this list later when we configure the list of feature flags to enable on the node being upgraded
On The Node That Was Upgraded
Uninstall RabbitMQ
yum remove rabbitmq-server-*
Remove the RabbitMQ lib directory
rm -rf /var/lib/rabbitmq
Remove the RabbitMQ config directory
rm -rf /etc/rabbitmq
Reinstall RabbitMQ
yum install rabbitmq-server <Version To Install>
Important: Before we start the new node, we need to update the initial set of feature flags to enable on startup.
Edit the rabbitmq.config file
vi /etc/rabbitmq/rabbitmq.config
Add our list of enabled feature flags to a forced_feature_flags_on_init entry in the config which should look like:
{forced_feature_flags_on_init, [quorum_queue, implicit_default_bindings, virtual_host_metadata]}]So when you are done, your rabbitmq.config file should look something like this:
[
  {rabbit, [
    {default_user, <<"guest">>},
    {default_pass, <<"r@bb1t">>},
    {collect_statistics_interval, 10000},
    {forced_feature_flags_on_init, [quorum_queue, implicit_default_bindings, virtual_host_metadata]}
  ]}
].
Start RabbitMQ
systemctl start rabbitmq-server
Verify we have the correct set of feature flags enabled
rabbitmqctl list_feature_flags
The output should look something like:
[root@node333 ~]# rabbitmqctl list_feature_flags
Listing feature flags ...
name                        state
drop_unroutable_metric      disabled
empty_basic_get_metric      disabled
implicit_default_bindings   enabled
maintenance_mode_status     disabled
quorum_queue                enabled
user_limits                 disabled
virtual_host_metadata       enabled
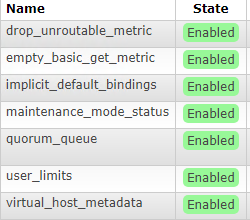
Notice that only the three feature flags we wanted enabled, are enabled, so we should be fine now to join our node to the cluster again.
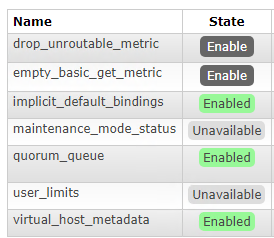
Also if you check the RabbitMQ management console on the new node you should see the feature flags as well:

Join the upgraded node to the cluster
rabbitmqctl stop_app
rabbitmqctl join_cluster  <ID of existing node>
rabbitmqctl start_app
If everything is successful, the output should look something like:
[root@node333 rabbitmq]# rabbitmqctl stop_app
Stopping rabbit application on node node333@node333 ...
[root@node333 rabbitmq]# rabbitmqctl join_cluster node111@node111
Clustering node node333@node333 with node111@node111
[root@node333 rabbitmq]# rabbitmqctl start_app
Starting node node333@node333 ...
[root@node333 rabbitmq]#
We have now successfully joined our new node running version 3.8.14 to our cluster of nodes running version 3.8.3.
So when you upgrade the rest of the nodes make sure to set the rabbitmq.config entry forced_feature_flags_on_init on each node AFTER upgrading but BEFORE starting it for the first time and save yourself all this trouble!
I hope that helps!


