RabbitMQ – How to Install RabbitMQ on Windows 10

In test and production environments I run RabbitMQ on Linux, but my development environment happens to be windows. I need to have a local instance of RabbitMQ. Since RabbitMQ supports Windows the setup is fairly straight forward, but there are some potential problems you can run into. This article is meant as a quick start to help get you up and running as soon as possible.

For this example I will be using the following versions:

Install Erlang

First thing to do is ensure the version of Erlang you are installing is compatible with the version of RabbitMQ you will be using. You can check the compatibility guide.

Download Erlang

Download Erlang from the main Erlang website. Note in this example we are using version 24.1
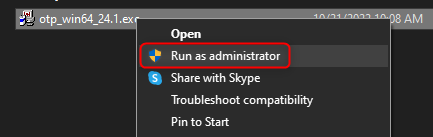
Run the Installer

Run the installer as Administrator, this is very important!!!

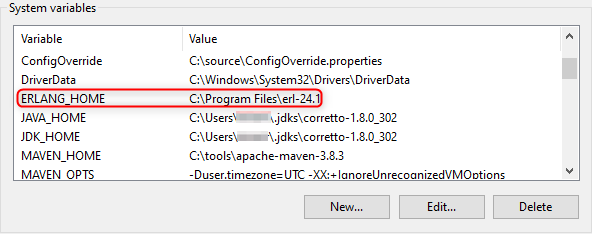
Create the Erlang Environment Variable

You will also need to create the ERLANG_HOME environment variable pointing to the root folder of where Erlang was installed.

I forgot to run the Erlang installer as Administrator, how do I fix it?

Installing as a non-administrator user leaves the .erlang.cookie in the wrong location. This makes it impossible to use rabbitmqctl.

Workarounds

You have two options to fix this problem:

  1. Uninstall Erlang and run the installer again as Administrator
  2. Move the .erlang.cookie to the correct location
    1. Copy the file .erlang.cookie manually from
      1. %SystemRoot% or %SystemRoot%\system32\config\systemprofile
      2. to %HOMEDRIVE%%HOMEPATH%

Install RabbitMQ

For reference, here is the link to the official RabbitMQ Installing on Windows instructions.

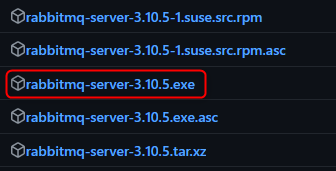
Download RabbitMQ from GitHub releases. Note in this example we are using version 3.10.5.

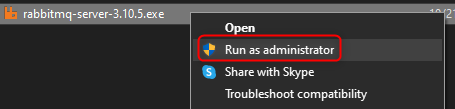
Run the installer as Administrator, this is extremely important!!!

Now you have successfully installed RabbitMQ. However, before we go any further you will want to install a very useful plugin called Management Plugin.

Enable Management Plugin

The Management Plugin for RabbitMQ enables a web interface you can use for managing your instance of RabbitMQ. This plugin is extremely useful and you will want it, especially in a development environment.

Open a PowerShell command prompt.

Set a variable called homedrive to be the root folder of your user account:

set homedrive=C:\users\<Username>

Go to the RabbitMQ sbin folder:

cd C:\Program Files\RabbitMQ Server\rabbitmq_server-3.10.5\sbin

Stop RabbitMQ:

rabbitmqctl.bat stop

Enable the plugin:

rabbitmq-plugins.bat enable rabbitmq_management

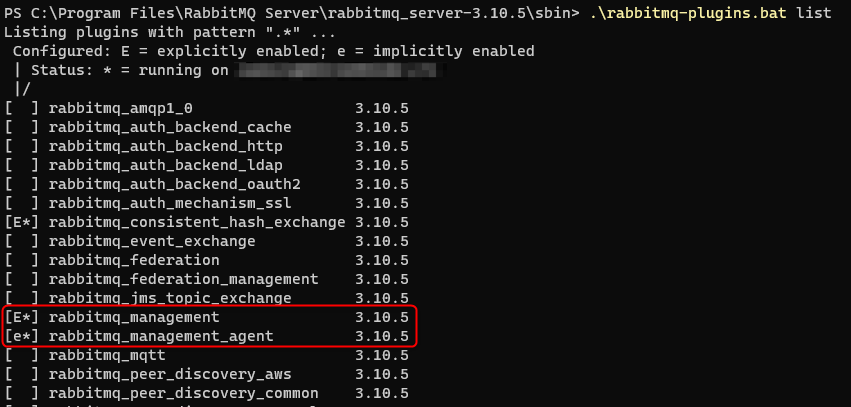
If successful you should now see the plugin in the list of enabled plugins:

rabbitmq-plugins.bat list

Start RabbitMQ:

rabbitmqctl.bat start

Login To Management Console

Go to Management Console webpage in a browser:

You should see a login prompt:

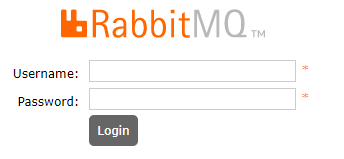
Login using the default guest user account (Note: This account ONLY works from localhost)

  • Username: guest
  • Password: guest

You should now see the Overview page.

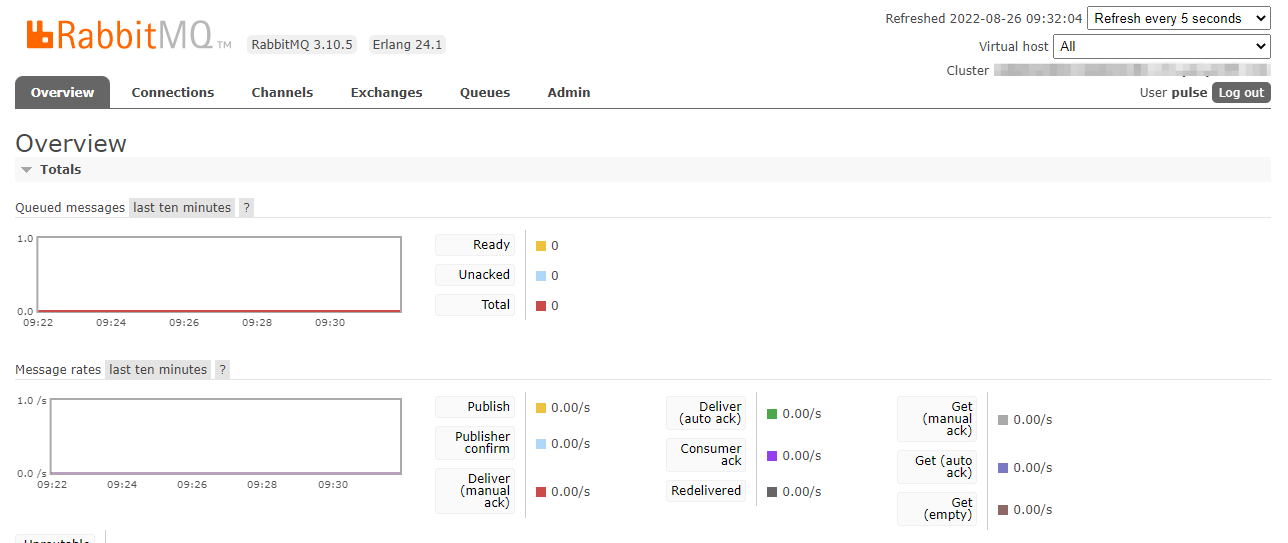
If you get this far, then congratulations, everything is working fine!

Setup RabbitMQ for Client Connections

Now that we have RabbitMQ up and running, before we can connect to it from a client there is some setup you should do. Primarily creating a Virtual Host and a User Account.

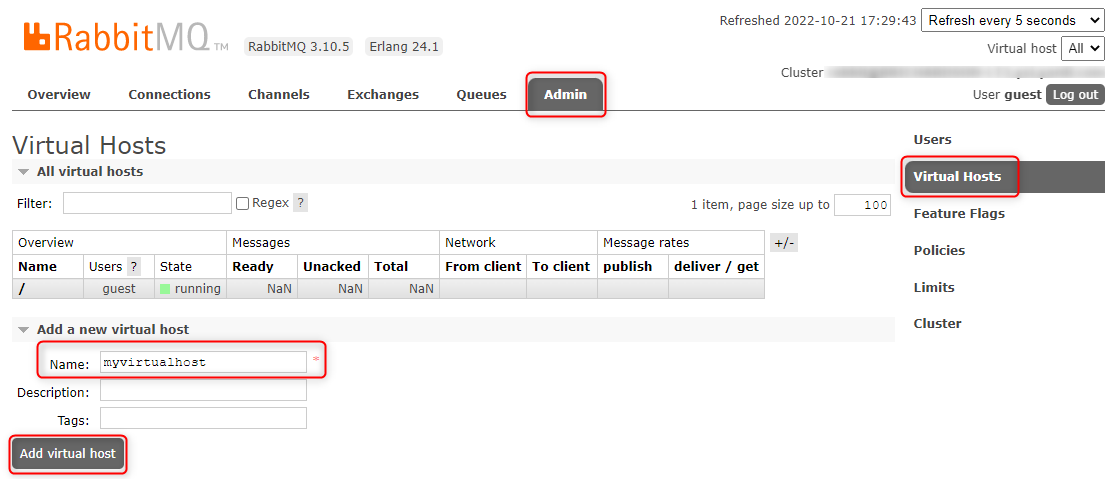
Create a Virtual Host

A Virtual Host in RabbitMQ is kind of like a namespace. It allows you to have multiple applications connecting to a single instance/cluster of RabbitMQ while keeping your connections, exchanges, queues, separate for each application.

Go to Admin -> Virtual Hosts and add a new virtual host:

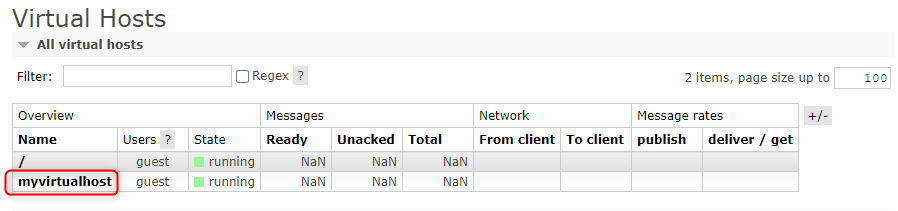
The new virtual host has now been added:

Create a User Account

Go to Admin -> Users and add a new user account. Also make sure to add the “administrator” tag if your user account is going to be used to create queues, etc.

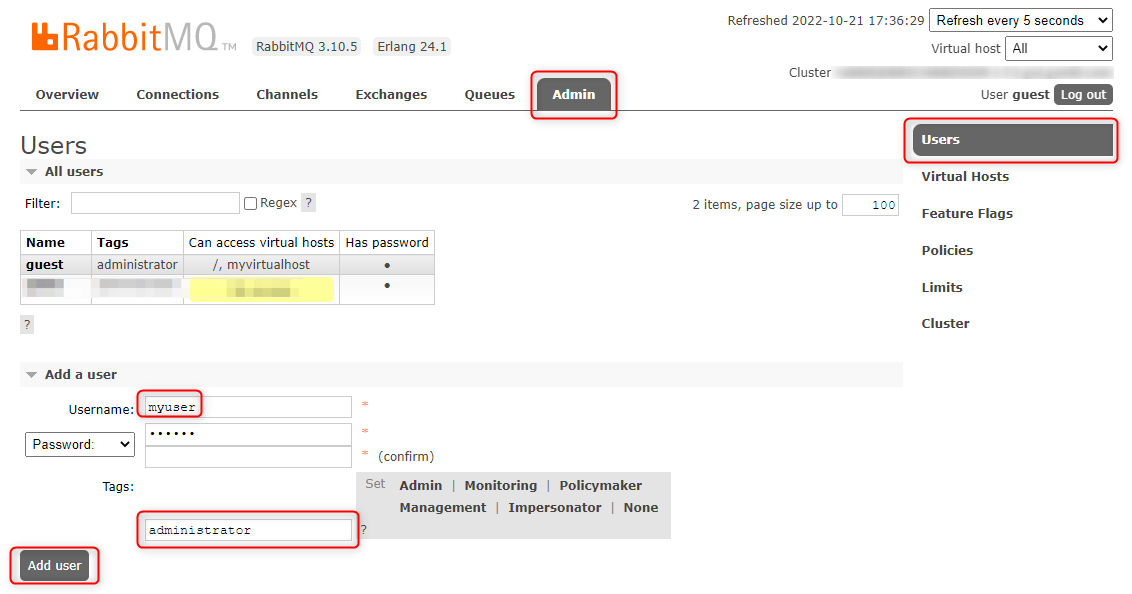
The new user account has been created:

Add Virtual Host to User

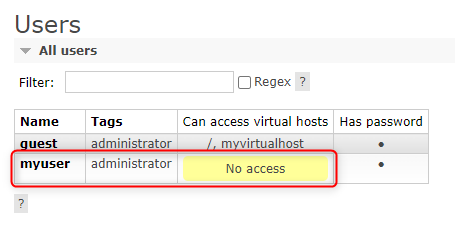
Note that the new user account does not have access to any virtual hosts yet. So we will add our virtual host to our user account next.

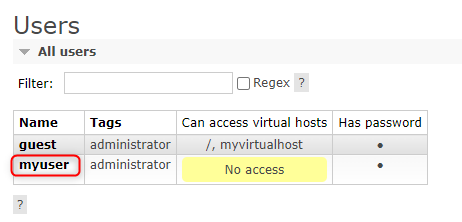
From the Admin -> Users tab click on the username of the user we just created:

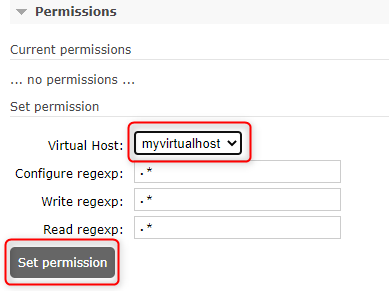
From the drop down select our virtual host and click the “Set Permissions” button:

If you go back to the Users tab you can see that your user account now has permissions to your virtual host:

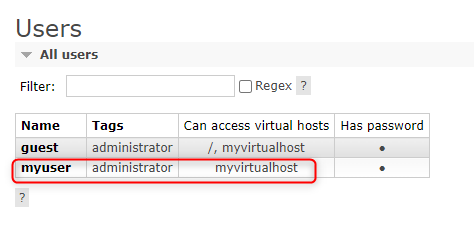
You can now connect a client to this instance of RabbitMQ using your virtual host and user account!

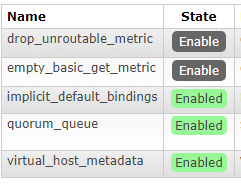
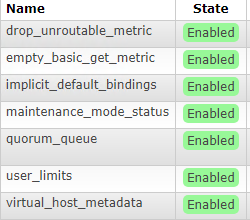
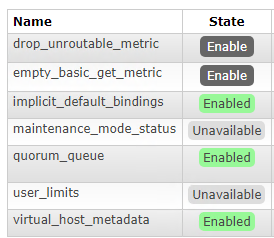
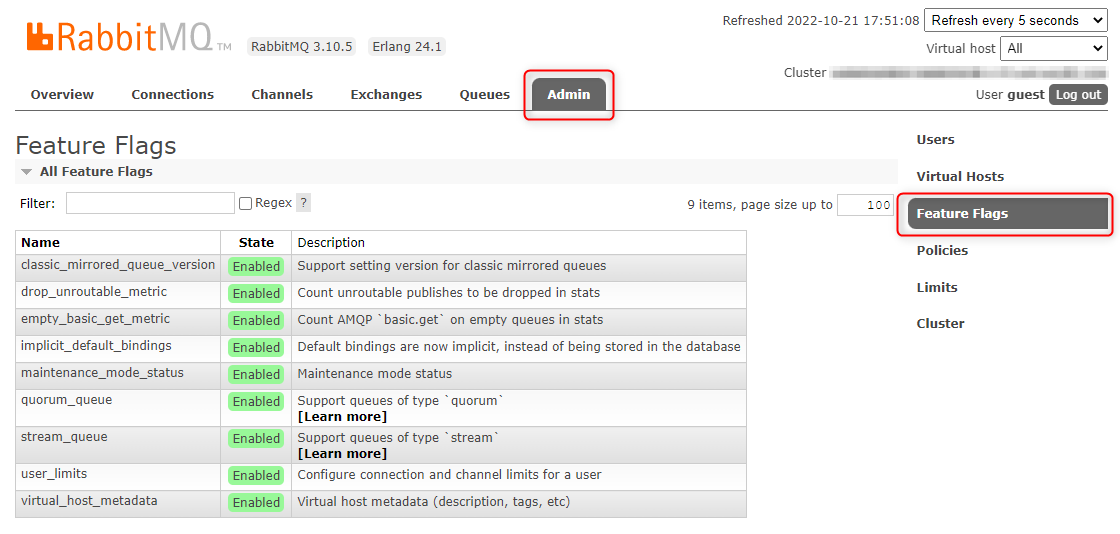
Enable Feature Flags

Just so you are aware, RabbitMQ uses Feature Flags when adding new features. This is a great approach since it allows you to more easily do rolling upgrades when upgrading a RabbitMQ cluster. Since a number of Feature Flags are off by default, you may want to enable these flags in your development environment if you are going to be using them in production.

You can view feature flags from Admin -> Feature Flags:

As a side note, if you are curious to read more about Feature flags as a pattern for deploying new features in an application, the following article is a really good introduction to this strategy:

Summary

That is all. I hope these instructions helped you get your instance of RabbitMQ up and running!

References

RabbitMQ – How to join a node to a cluster when you get the error: incompatible_feature_flags

If you are reading this post it is because you have received the dreaded incompatible_feature_flags error when trying to join an upgraded node or a newly created node to an existing RabbitMQ cluster.

I will describe the scenario that got me into this situation and the solution I used to resolve it.

Scenario

I have a three node RabbitMQ cluster running on CentOS. The existing three nodes are running version 3.8.3, but I wanted to upgrade to version 3.8.14. Now, these two RabbitMQ versions require different versions of Erlang, so Erlang must be upgraded from 22+ to 23+.

When BOTH versions of RabbitMQ use the SAME version of Erlang, the RabbitMQ installer will just do a normal upgrade, carrying forward settings, such as feature flags, cluster configuration, from the previous install.

However, when the version of Erlang needs to be upgraded, you cannot just upgrade RabbitMQ, instead you must:

  • Uninstall RabbitMQ
  • Upgrade Erlang
  • Reinstall RabbitMQ

On a new install of RabbitMQ, it by default enables ALL feature flags.

The documentation does provide you with a config option called forced_feature_flags_on_init to override the list of enabled feature flags, however this option only works if set BEFORE starting RabbitMQ on the node for the very first time. After you have already started RabbitMQ for the first time, it will have no effect.

Here is what you will find in the RabbitMQ documentation on How To Disable Feature Flags:

Also if you try to uninstall and reinstall RabbitMQ thinking that will give you a clean slate, it will not. The uninstall does not remove the local RabbitMQ database which is where the enabled feature flag settings are stored.

So basically I am stuck in this scenario where my existing nodes have the feature flags:

But my upgrade node has the feature flags:

So when I try to join my upgraded node to the cluster I get the error:

[root@node333 ~]# rabbitmqctl stop_app
Stopping rabbit application on node node333@node333 ...
[root@node333 ~]# rabbitmqctl join_cluster node111@node111
Clustering node node333@node333 with node111@node111
Error:
incompatible_feature_flags

But do not worry, I have a solution that worked!

Solution

The following is a step by step solution that worked for me to solve the incompatible feature flags issue.

For this example let’s say we have three nodes:

  • node111
  • node222
  • node333 – This is the node being upgraded

On an Existing Node in the Cluster

Ensure the upgraded node has been removed from the cluster

rabbitmqctl forget_cluster_node <ID of upgraded node>

Get the list of enabled feature flags

rabbitmqctl list_feature_flags

The output should look like:

[root@node111 ~]# rabbitmqctl list_feature_flags
Listing feature flags ...
name                        state
drop_unroutable_metric      disabled
empty_basic_get_metric      disabled
implicit_default_bindings   enabled
quorum_queue                enabled
virtual_host_metadata       enabled

So out of this list the only feature flags enabled are:

  • implicit_default_bindings
  • quorum_queue
  • virtual_host_metadata

Note: We will need this list later when we configure the list of feature flags to enable on the node being upgraded

On The Node That Was Upgraded

Uninstall RabbitMQ

yum remove rabbitmq-server-*

Remove the RabbitMQ lib directory

rm -rf /var/lib/rabbitmq

Remove the RabbitMQ config directory

rm -rf /etc/rabbitmq

Reinstall RabbitMQ

yum install rabbitmq-server <Version To Install>

Important: Before we start the new node, we need to update the initial set of feature flags to enable on startup.

Edit the rabbitmq.config file

vi /etc/rabbitmq/rabbitmq.config

Add our list of enabled feature flags to a forced_feature_flags_on_init entry in the config which should look like:

{forced_feature_flags_on_init, [quorum_queue, implicit_default_bindings, virtual_host_metadata]}]

So when you are done, your rabbitmq.config file should look something like this:

[
  {rabbit, [
    {default_user, <<"guest">>},
    {default_pass, <<"r@bb1t">>},
    {collect_statistics_interval, 10000},
    {forced_feature_flags_on_init, [quorum_queue, implicit_default_bindings, virtual_host_metadata]}
  ]}
].

Start RabbitMQ

systemctl start rabbitmq-server

Verify we have the correct set of feature flags enabled

rabbitmqctl list_feature_flags

The output should look something like:

[root@node333 ~]# rabbitmqctl list_feature_flags
Listing feature flags ...
name                        state
drop_unroutable_metric      disabled
empty_basic_get_metric      disabled
implicit_default_bindings   enabled
maintenance_mode_status     disabled
quorum_queue                enabled
user_limits                 disabled
virtual_host_metadata       enabled

Notice that only the three feature flags we wanted enabled, are enabled, so we should be fine now to join our node to the cluster again.

Also if you check the RabbitMQ management console on the new node you should see the feature flags as well:

Join the upgraded node to the cluster

rabbitmqctl stop_app
rabbitmqctl join_cluster  <ID of existing node>
rabbitmqctl start_app

If everything is successful, the output should look something like:

[root@node333 rabbitmq]# rabbitmqctl stop_app
Stopping rabbit application on node node333@node333 ...
[root@node333 rabbitmq]# rabbitmqctl join_cluster node111@node111
Clustering node node333@node333 with node111@node111
[root@node333 rabbitmq]# rabbitmqctl start_app
Starting node node333@node333 ...
[root@node333 rabbitmq]#

We have now successfully joined our new node running version 3.8.14 to our cluster of nodes running version 3.8.3.

So when you upgrade the rest of the nodes make sure to set the rabbitmq.config entry forced_feature_flags_on_init on each node AFTER upgrading but BEFORE starting it for the first time and save yourself all this trouble!

I hope that helps!

RabbitMQ – How to do a Rolling upgrade in a Cluster (Version 3.8+)

Recently I had the task of upgrading several RabbitMQ clusters that were each running at least version 3.8 of RabbitMQ. We wanted to roll out each upgrade with no downtime. Overall, the documentation provided by RabbitMQ on Upgrading, Rolling Upgrades, and Feature Flags is generally pretty good.

The problem in the documentation is it mostly covers upgrades where ONLY RabbitMQ is being upgraded, but the version of Erlang stays the same. The following is a summary of the steps I used to upgrade RabbitMQ in a cluster both when an Erlang change was and was not required.

Note: The following examples were created using a cluster of three RabbitMQ servers running on CentOS.

Upgrade when No Erlang Change Required

Upgrade steps when Erlang version is compatible with BOTH RabbitMQ versions.

Scenario

Let’s say, for example we have the following upgrade scenario:

Current install:

  • RabbitMQ: 3.8.12
  • Erlang: 23.2.3

Upgrading to:

  • RabbitMQ: 3.8.14
  • Erlang: 23.2.3

Note: Notice that both versions of RabbitMQ are compatible with the same version of Erlang.

When both the current version of RabbitMQ and the version you want to upgrade to are compatible with the same version of Erlang, then an upgrade is very straight forward. RabbitMQ will simply update the existing RabbitMQ install and carry forward existing settings, such as feature flags and cluster information, when performing an upgrade.

Upgrade Steps

Execute the following steps on each node, upgrading one node at a time:

Stop RabbitMQ

systemctl stop rabbitmq-server

Upgrade your version of RabbitMQ

yum install rabbitmq-server 3.8.14-1.e17

Start RabbitMQ

systemctl start rabbitmq-server

That should be it. Just repeat these steps on each node in the cluster until all nodes are upgraded.

When the Erlang version already in use is compatible with the version of RabbitMQ you are upgrading to, it is a very simple procedure. The RabbitMQ installer treats the install as an upgrade and carries forward all existing settings, such as feature flags, cluster information, etc.

Note: At the time I wrote this article, we were not yet using the Maintenance Mode feature flag, so I have not included the step to drain the node, however it is highly recommended!

Upgrade when Erlang Change Required

Upgrade steps when the version of RabbitMQ we are upgrading to also requires a newer version of Erlang than what is currently installed.

Scenario

Let’s say, for example we have the following upgrade scenario:

Current install:

  • RabbitMQ: 3.8.3
  • Erlang: 22.1.6

Upgrading to:

  • RabbitMQ: 3.8.14
  • Erlang: 23.2.3

Note: Notice that we need to upgrade from Erlang 22+ to Erlang 23+ since RabbitMQ 3.8.14 is not compatible with Erlang version 22+. You can verify the version of Erlang you need using the RabbitMQ Erlang Compatibility Guide.

An Erlang version change requires all apps dependent on that version be uninstalled. So we have to:

  • uninstall RabbitMQ
  • upgrade Erlang
  • reinstall RabbitMQ

Issues with Erlang Change

The problem with this upgrade scenario is that it makes the RabbitMQ installer treat it as a brand new install, not an upgrade, so no settings from the current install, such as feature flags, cluster information, will be carried forward.

Feature Flags

On a new install, RabbitMQ by default enables ALL feature flags, so you will need to adjust the feature flags on the upgraded node to match the ones on your existing nodes to ensure the upgraded node can be successfully rejoined to the cluster.

Cluster Information

Since we had to uninstall RabbitMQ and reinstall it, it is now a brand new node and will have lost it’s cluster configuration. When RabbitMQ starts up it will now be running as a standalone node. However, the cluster still thinks the node exists and is just down, but since the node is no longer part of a cluster, even when you start the node up, it will not be able to rejoin as a node in the existing cluster.

Additional Steps

As a result you will need to do some additional steps which include:

  • Remove the node being upgraded from the cluster and join it back after the upgrade is complete
  • Configure feature flags on the upgraded node to enable ONLY ones enabled on other nodes in the cluster

Upgrade Steps

Execute the following steps on each node, one at a time:

On Any Node In The Cluster

Get the ID’s for all the nodes in the cluster

rabbitmqctl cluster_status

In the output there should be a section called Running Nodes which has the ID’s for all nodes in the cluster

Running Nodes

upgradenode@upgradenode
existingnode@existingnode
someothernode@someothernode

In this first pass we will be upgrading the node with the ID upgradenode@upgradenode.

Get list of enabled feature flags

rabbitmqctl list_feature_flags

The output should look something like this:

[root@existingnode ~]# rabbitmqctl list_feature_flags
Listing feature flags ...
name                        state
drop_unroutable_metric      disabled
empty_basic_get_metric      disabled
implicit_default_bindings   enabled
quorum_queue                enabled
virtual_host_metadata       enabled

So out of this list the only feature flags enabled are:

  • implicit_default_bindings
  • quorum_queue
  • virtual_host_metadata

Note: We will need this list later when we configure the list of feature flags to enable on the node being upgraded

On A Node Not Being Upgraded

Remove the node we are going to upgrade from the cluster

rabbitmqctl forget_cluster_node <ID of node being upgraded>

On The Node Being Upgraded

Stop RabbitMQ

systemctl stop rabbitmq-server

Uninstall RabbitMQ

yum remove rabbitmq-server-*

Uninstall Erlang

yum remove erlang-*

Install the new version of Erlang

yum install erlang 23.2.3-1.el7

Install the new version of RabbitMQ

yum install rabbitmq-server 3.8.14-1.e17

Important: Before we start the new node, we need to update the initial set of feature flags to enable on startup.

Edit the rabbitmq.config file

vi /etc/rabbitmq/rabbitmq.config

Add our list of enabled feature flags to a forced_feature_flags_on_init entry in the config which should look like:

{forced_feature_flags_on_init, [quorum_queue, implicit_default_bindings, virtual_host_metadata]}]

So when you are done, your rabbitmq.config file should look something like this:


[
  {rabbit, [
    {default_user, <<"guest">>},
    {default_pass, <<"r@bb1t">>},
    {collect_statistics_interval, 10000},
    {forced_feature_flags_on_init, [quorum_queue, implicit_default_bindings, virtual_host_metadata]}
  ]}
].

Start RabbitMQ

systemctl start rabbitmq-server

Verify we have the correct set of feature flags enabled

rabbitmqctl list_feature_flags

The output should look something like:

[root@upgradenode ~]# rabbitmqctl list_feature_flags
Listing feature flags ...
name                        state
drop_unroutable_metric      disabled
empty_basic_get_metric      disabled
implicit_default_bindings   enabled
maintenance_mode_status     disabled
quorum_queue                enabled
user_limits                 disabled
virtual_host_metadata       enabled

Notice that only the three feature flags we wanted enabled, are enabled, so we should be fine now to join our node to the cluster again.

Join node to cluster

rabbitmqctl stop_app
rabbitmqctl join_cluster  <ID of existing node>
rabbitmqctl start_app

If everything is successful, the output should look something like:

[root@upgradenode rabbitmq]# rabbitmqctl stop_app
Stopping rabbit application on node upgradenode@upgradenode ...
[root@upgradenode rabbitmq]# rabbitmqctl join_cluster existingnode@existingnode
Clustering node upgradenode@upgradenode with existingnode@existingnode
[root@upgradenode rabbitmq]# rabbitmqctl start_app
Starting node upgradenode@upgradenode ...
[root@upgradenode rabbitmq]#

You have now successfully upgraded a node and joined it back into the cluster! You can now repeat these steps on each node until the entire cluster has been upgraded.

I hope that helps!

Resources