SQL Server – How to Rebuild Indexes Online on Large Partitioned Tables

Rebuilding a Partitioned Index

I regularly work with some very large tables that use SQL Server Partitions. We use daily, weekly, or monthly partitions based on the frequency of the data we are receiving. Just to give you an idea of what I am dealing with, I have one table that uses daily partitions and has 500 Billion rows!

The main issue I run into is dealing with index fragmentation. Once I am done inserting data into a partition of historical data, I want to defragment the index on that partition since I don’t have to worry about it fragmenting again. In SQL Server 2012 and older the problem was that when I wanted to rebuild partitions ONLINE I had to rebuild ALL partitions on the table, or do it OFFLINE if rebuilding a single partition. Neither of these options were ideal.

The good news is that as of SQL Server 2014 we now have the ability to rebuild a single partition ONLINE, for example:

ALTER INDEX PK_MY_INDEX
ON Tutorial.MY_TABLE
REBUILD PARTITION = 123 
WITH (ONLINE = ON)

For my partitions that are time based, once the time period has passed, only that partition needs to have it’s index rebuilt. In this use case it is a big advantage to be able to rebuild the index on a single partition or a range of partitions as part of regularly scheduled maintenance.

As an example, let’s create a table with a partitioned index, add some data, and cause the index to become fragmented. In this example I will show you some of the common scripts I use to detect fragmentation and rebuild a range of indexes online.

Create a Table with a Partitioned Index

Lets start by creating a partition table and index.

Create a partition function by month for a year.

CREATE partition FUNCTION MonthlyPartitionFunction (smalldatetime) AS range RIGHT FOR VALUES (  
	N'2023-02-01T00:00:00',  
	N'2023-03-01T00:00:00',  
	N'2023-04-01T00:00:00',  
	N'2023-05-01T00:00:00',  
	N'2023-06-01T00:00:00',  
	N'2023-07-01T00:00:00', 
	N'2023-08-01T00:00:00', 
	N'2023-09-01T00:00:00', 
	N'2023-10-01T00:00:00', 
	N'2023-11-01T00:00:00', 
	N'2023-12-01T00:00:00',
	N'2024-01-01T00:00:00'); 
GO

Note: The dates above are the end date of the partition. So if you insert a record with the datetime 2023-03-22 it will be in partition 2023-04-01. If you want to get a better understanding of range LEFT vs range RIGHT, you can get a good explanation here.

Create a partition scheme using our monthly partition. The partition scheme maps the partition function to a filegroup which maps to the physical files stored on disk.

CREATE PARTITION SCHEME MonthlyPartitionScheme  
AS PARTITION MonthlyPartitionFunction ALL TO ([PRIMARY])
GO

Create a table to store our timeseries history data.

CREATE TABLE dbo.TimeSeriesHistory(
    [TimeSeriesID] int NOT NULL,
    [RecordDateTime] smalldatetime NOT NULL,
    [Value] real NOT NULL)
GO

Finally let’s create a primary key index on our table using our monthly partition scheme.

ALTER TABLE dbo.TimeSeriesHistory 
ADD CONSTRAINT PK_TimeSeriesHistory_TimeSeriesID_RecordDateTime
    PRIMARY KEY CLUSTERED (  
        TimeSeriesID ASC,  
        RecordDateTime ASC
    )  
    WITH (  
        IGNORE_DUP_KEY = ON,  
        ONLINE = ON,  
        PAD_INDEX = OFF, STATISTICS_NORECOMPUTE = OFF, ALLOW_ROW_LOCKS = ON, ALLOW_PAGE_LOCKS = ON  
    )  
    ON MonthlyPartitionScheme(RecordDateTime);
GO

Generate Test Data

Now let’s insert some data into our new table and since we are not inserting the data in order, we should end up with fragmented indexes on each partition.

DECLARE @current int = 1;
DECLARE @end int = 100000;
 
WHILE @current < @end
BEGIN
	DECLARE @date smalldatetime = DATEADD(DAY, ABS(CHECKSUM(NEWID()) % 364 ), '2023-01-01')

	DECLARE @a varchar(32)
	SET @a = convert(varchar(32), @date, 121)

    RAISERROR('Insert data for %s', 0, 1, @a) WITH NOWAIT

	INSERT INTO dbo.TimeSeriesHistory (TimeSeriesID, RecordDateTime, [Value])
	VALUES (FLOOR(RAND()*(10000)+1), @date, ROUND(RAND() *100000, 0))

	SET @current = @current + 1;
END
GO

This query shows the test data that was generated, rolled up by month.

SELECT 
	DATEPART(YEAR, RecordDateTime) AS year,
	DATEPART(MONTH, RecordDateTime) AS month,
	COUNT(TimeSeriesID) AS count
FROM dbo.TimeSeriesHistory
GROUP BY
  DATEPART(YEAR, RecordDateTime),
  DATEPART(MONTH, RecordDateTime)
ORDER BY
  DATEPART(YEAR, RecordDateTime),
  DATEPART(MONTH, RecordDateTime);
year        month       count
----------- ----------- -----------
2023 1 8315
2023 2 7648
2023 3 8355
2023 4 8085
2023 5 8428
2023 6 8174
2023 7 8420
2023 8 8396
2023 9 8075
2023 10 8436
2023 11 8213
2023 12 8111

This next query shows the total number of rows per partition.

SELECT partition_number AS 'PartitionNumber',
	prv.value AS 'PartitionName', 
	[rows] AS 'TotalRows'
FROM sys.partitions p
INNER JOIN sys.objects o
     ON p.object_id = o.object_id
INNER JOIN sys.indexes i
    ON p.object_id = i.object_id
    AND p.index_id = i.index_id
INNER JOIN sys.partition_schemes ps
     ON ps.data_space_id = i.data_space_id
LEFT OUTER JOIN sys.partition_range_values prv
     ON ps.function_id = prv.function_id
     AND p.partition_number = prv.boundary_id
WHERE i.name = 'PK_TimeSeriesHistory_TimeSeriesID_RecordDateTime'
ORDER BY partition_number
PartitionNumber PartitionName               TotalRows
--------------- -------------------------- --------------------
1 2023-02-01 00:00:00.000 8315
2 2023-03-01 00:00:00.000 7648
3 2023-04-01 00:00:00.000 8355
4 2023-05-01 00:00:00.000 8085
5 2023-06-01 00:00:00.000 8428
6 2023-07-01 00:00:00.000 8174
7 2023-08-01 00:00:00.000 8420
8 2023-09-01 00:00:00.000 8396
9 2023-10-01 00:00:00.000 8075
10 2023-11-01 00:00:00.000 8436
11 2023-12-01 00:00:00.000 8213
12 2024-01-01 00:00:00.000 8111

Now that we have our partitioned table populated with data, we can look at how to check index fragmentation and rebuild the indexes.

Check Index Fragmentation

We can check the fragmentation percentage of the index on each partition by providing the name of the index to the following query.

SELECT
 a.partition_number AS 'PartitionNumber',
 prv.value AS 'PartitionName',
 a.avg_fragmentation_in_percent AS 'FragmentationPercentage'
FROM sys.indexes i
INNER JOIN sys.partition_schemes ps
	ON ps.data_space_id = i.data_space_id
JOIN sys.dm_db_index_physical_stats (DB_ID(), NULL, NULL , NULL, 'LIMITED') a 
	ON a.object_id = i.object_id and a.index_id = i.index_id
LEFT OUTER JOIN sys.partition_range_values prv
    ON ps.function_id = prv.function_id
    AND a.partition_number = prv.boundary_id
WHERE i.name = 'PK_TimeSeriesHistory_TimeSeriesID_RecordDateTime'

You can see in the output below that the indexes on each partition have fragmentation.

PartitionNumber PartitionName              FragmentationPercentage
--------------- -------------------------- -----------------------
1 2023-02-01 00:00:00.000 96.875
2 2023-03-01 00:00:00.000 96.875
3 2023-04-01 00:00:00.000 96.875
4 2023-05-01 00:00:00.000 96.774
5 2023-06-01 00:00:00.000 96.875
6 2023-07-01 00:00:00.000 96.875
7 2023-08-01 00:00:00.000 96.875
8 2023-09-01 00:00:00.000 96.875
9 2023-10-01 00:00:00.000 96.875
10 2023-11-01 00:00:00.000 96.875
11 2023-12-01 00:00:00.000 96.875
12 2024-01-01 00:00:00.000 96.875

Rebuild Indexes For a Range of Partitions

When I have a range of partitions where the indexes are fragmented, I find the simplest way to rebuild all the indexes is to just loop through the partition IDs and rebuild each partition index, one at a time, online. For our example table we can loop through the partition IDs 1 to 12.

DECLARE
      @CurrentPartitionNumber int = 1
    , @EndPartitionNumber int = 12;
 
WHILE @CurrentPartitionNumber <= @EndPartitionNumber
BEGIN
	RAISERROR('Rebuilding partition %d', 0, 1, @CurrentPartitionNumber) WITH NOWAIT;

    ALTER INDEX PK_TimeSeriesHistory_TimeSeriesID_RecordDateTime
        ON dbo.TimeSeriesHistory
        REBUILD Partition = @CurrentPartitionNumber
        WITH(ONLINE=ON);

    SET @CurrentPartitionNumber += 1;
END;
GO

Here is the output from running the script.

Rebuilding partition 1
Rebuilding partition 2
Rebuilding partition 3
Rebuilding partition 4
Rebuilding partition 5
Rebuilding partition 6
Rebuilding partition 7
Rebuilding partition 8
Rebuilding partition 9
Rebuilding partition 10
Rebuilding partition 11
Rebuilding partition 12

If you run the script to check index fragmentation again, you will see that the fragmentation percentage has improved.

PartitionNumber PartitionName              FragmentationPercentage
--------------- -------------------------- -----------------------
1 2023-02-01 00:00:00.000 4.545
2 2023-03-01 00:00:00.000 5
3 2023-04-01 00:00:00.000 4.545
4 2023-05-01 00:00:00.000 4.762
5 2023-06-01 00:00:00.000 4.545
6 2023-07-01 00:00:00.000 4.545
7 2023-08-01 00:00:00.000 4.545
8 2023-09-01 00:00:00.000 4.545
9 2023-10-01 00:00:00.000 4.762
10 2023-11-01 00:00:00.000 4.545
11 2023-12-01 00:00:00.000 4.545
12 2024-01-01 00:00:00.000 4.545

Scheduled Maintenance

To avoid having to perform manual maintenance on the indexes on partitioned tables, the simplest option is to just create a scheduled SQL Agent Job and have this done for you automatically.

For this example where we have a table with monthly partitions, we could create a SQL Agent job to run on the first of each month and rebuild the previous months partition.

If we run the following script on Dec 1st, 2023, it will rebuild the index for the most recent partition to which we are no longer adding any more data, which is 2023-12-01, partition number 11.

Here is the script.

DECLARE @CurrentPartitionNumber int = 0;  
DECLARE @EndPartitionNumber int = 0;  

-- Get the min and max partition numbers to rebuild
SELECT @CurrentPartitionNumber = MIN(a.partition_number),  
	@EndPartitionNumber = MAX(a.partition_number)  
FROM sys.partitions a  
	JOIN sys.indexes i on a.object_id = i.object_id and a.index_id = i.index_id  
	INNER JOIN sys.partition_schemes ps 
		ON ps.data_space_id = i.data_space_id  
	LEFT OUTER JOIN sys.partition_range_values prv 
		ON ps.function_id = prv.function_id AND a.partition_number = prv.boundary_id  
WHERE i.name = 'PK_TimeSeriesHistory_TimeSeriesID_RecordDateTime'  
  AND year(CAST(prv.[value] AS smalldatetime)) = year(GETUTCDATE())  
  AND month(CAST(prv.[value] AS smalldatetime)) = month(GETUTCDATE())  

-- Rebuild the partitions one at a time
WHILE @CurrentPartitionNumber <= @EndPartitionNumber  
BEGIN  
	RAISERROR('Rebuilding partition %d', 0, 1, @CurrentPartitionNumber) WITH NOWAIT;  

	ALTER INDEX PK_TimeSeriesHistory_TimeSeriesID_RecordDateTime  
		ON dbo.TimeSeriesHistory  
		REBUILD Partition = @CurrentPartitionNumber  
		WITH(ONLINE=ON);  

	SET @CurrentPartitionNumber += 1;  
END; 
GO

In the output, you can see that the script only rebuilt the index for partition 11.

Rebuilding partition 11

Completion time: 2023-12-01T16:23:11.9621045-06:00

You can easily adjust the WHERE clause of this script to rebuild a longer range of partitions for whatever you need for your use case (e.g., weekly job to rebuild the daily partitions for the last seven days).

Summary

Partitioning tables in SQL Server is a very useful tool to manage large amounts of data. Now that we can rebuild indexes per partition online it gives us a lot more flexibility to maintain a large table where downtime is not an option.

I hope this helps!

RabbitMQ – How to Install RabbitMQ on Windows 10

In test and production environments I run RabbitMQ on Linux, but my development environment happens to be windows. I need to have a local instance of RabbitMQ. Since RabbitMQ supports Windows the setup is fairly straight forward, but there are some potential problems you can run into. This article is meant as a quick start to help get you up and running as soon as possible.

For this example I will be using the following versions:

Install Erlang

First thing to do is ensure the version of Erlang you are installing is compatible with the version of RabbitMQ you will be using. You can check the compatibility guide.

Download Erlang

Download Erlang from the main Erlang website. Note in this example we are using version 24.1

Run the Installer

Run the installer as Administrator, this is very important!!!

Create the Erlang Environment Variable

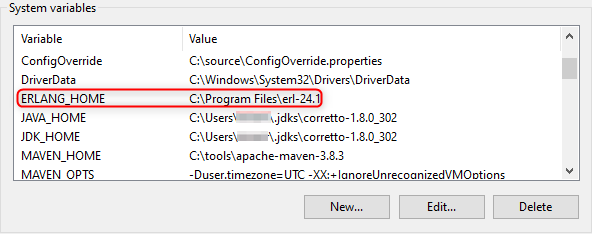
You will also need to create the ERLANG_HOME environment variable pointing to the root folder of where Erlang was installed.

I forgot to run the Erlang installer as Administrator, how do I fix it?

Installing as a non-administrator user leaves the .erlang.cookie in the wrong location. This makes it impossible to use rabbitmqctl.

Workarounds

You have two options to fix this problem:

  1. Uninstall Erlang and run the installer again as Administrator
  2. Move the .erlang.cookie to the correct location
    1. Copy the file .erlang.cookie manually from
      1. %SystemRoot% or %SystemRoot%\system32\config\systemprofile
      2. to %HOMEDRIVE%%HOMEPATH%

Install RabbitMQ

For reference, here is the link to the official RabbitMQ Installing on Windows instructions.

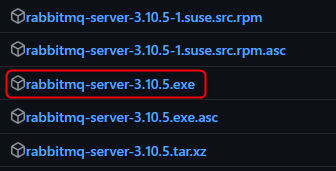
Download RabbitMQ from GitHub releases. Note in this example we are using version 3.10.5.

Run the installer as Administrator, this is extremely important!!!

Now you have successfully installed RabbitMQ. However, before we go any further you will want to install a very useful plugin called Management Plugin.

Enable Management Plugin

The Management Plugin for RabbitMQ enables a web interface you can use for managing your instance of RabbitMQ. This plugin is extremely useful and you will want it, especially in a development environment.

Open a PowerShell command prompt.

Set a variable called homedrive to be the root folder of your user account:

set homedrive=C:\users\<Username>

Go to the RabbitMQ sbin folder:

cd C:\Program Files\RabbitMQ Server\rabbitmq_server-3.10.5\sbin

Stop RabbitMQ:

rabbitmqctl.bat stop

Enable the plugin:

rabbitmq-plugins.bat enable rabbitmq_management

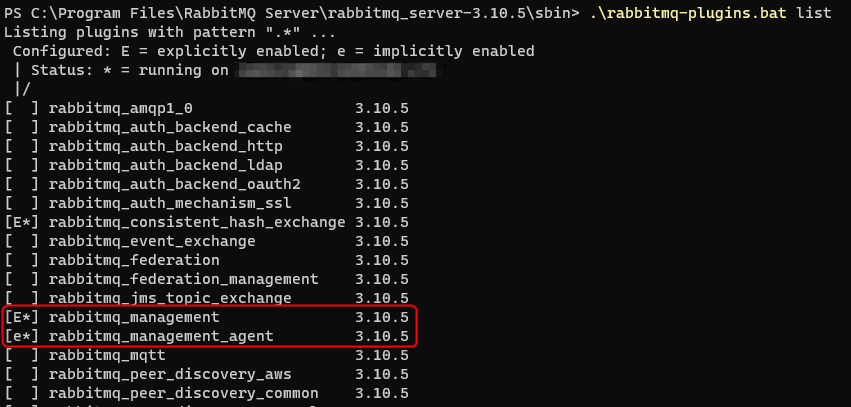
If successful you should now see the plugin in the list of enabled plugins:

rabbitmq-plugins.bat list

Start RabbitMQ:

rabbitmqctl.bat start

Login To Management Console

Go to Management Console webpage in a browser:

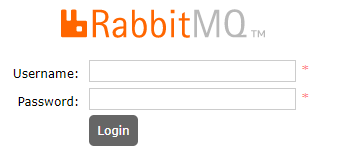
You should see a login prompt:

Login using the default guest user account (Note: This account ONLY works from localhost)

  • Username: guest
  • Password: guest

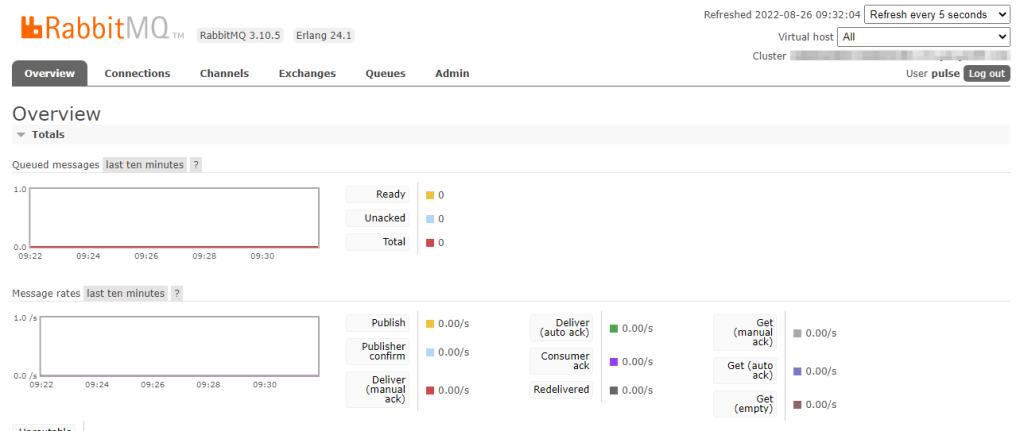
You should now see the Overview page.

If you get this far, then congratulations, everything is working fine!

Setup RabbitMQ for Client Connections

Now that we have RabbitMQ up and running, before we can connect to it from a client there is some setup you should do. Primarily creating a Virtual Host and a User Account.

Create a Virtual Host

A Virtual Host in RabbitMQ is kind of like a namespace. It allows you to have multiple applications connecting to a single instance/cluster of RabbitMQ while keeping your connections, exchanges, queues, separate for each application.

Go to Admin -> Virtual Hosts and add a new virtual host:

The new virtual host has now been added:

Create a User Account

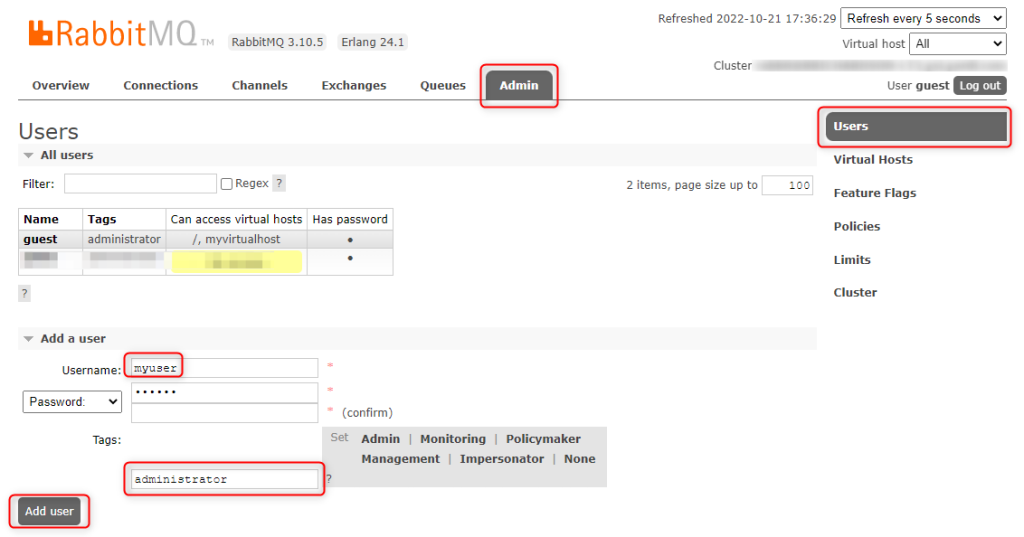
Go to Admin -> Users and add a new user account. Also make sure to add the “administrator” tag if your user account is going to be used to create queues, etc.

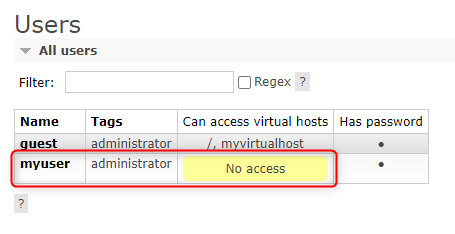
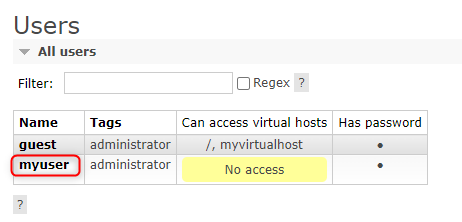
The new user account has been created:

Add Virtual Host to User

Note that the new user account does not have access to any virtual hosts yet. So we will add our virtual host to our user account next.

From the Admin -> Users tab click on the username of the user we just created:

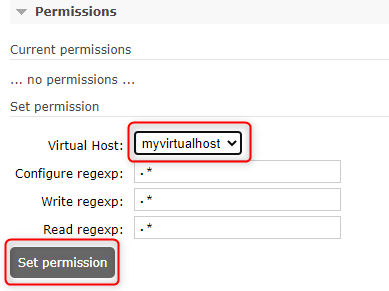
From the drop down select our virtual host and click the “Set Permissions” button:

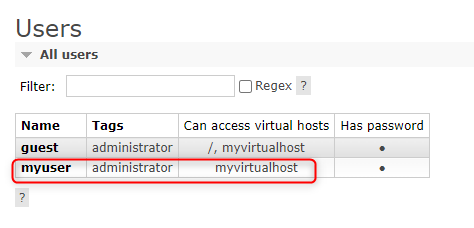
If you go back to the Users tab you can see that your user account now has permissions to your virtual host:

You can now connect a client to this instance of RabbitMQ using your virtual host and user account!

Enable Feature Flags

Just so you are aware, RabbitMQ uses Feature Flags when adding new features. This is a great approach since it allows you to more easily do rolling upgrades when upgrading a RabbitMQ cluster. Since a number of Feature Flags are off by default, you may want to enable these flags in your development environment if you are going to be using them in production.

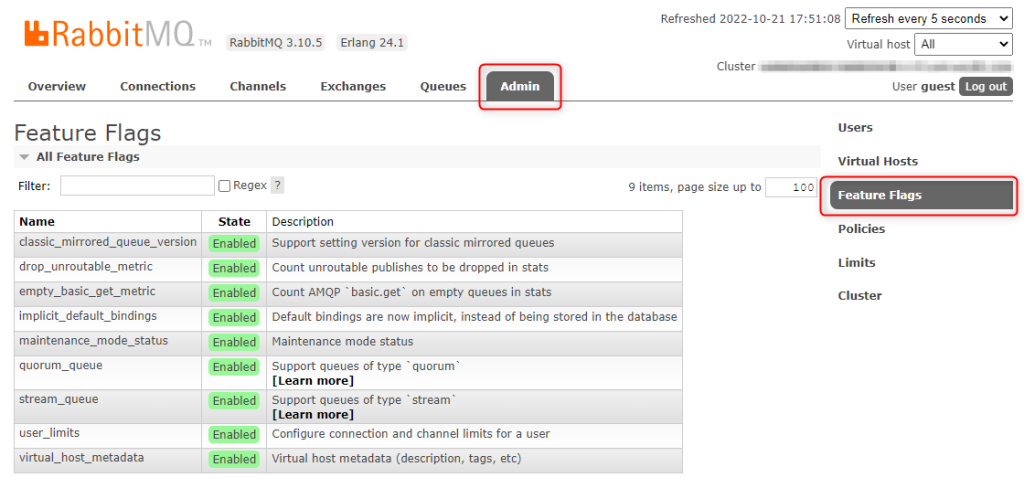
You can view feature flags from Admin -> Feature Flags:

As a side note, if you are curious to read more about Feature flags as a pattern for deploying new features in an application, the following article is a really good introduction to this strategy:

Summary

That is all. I hope these instructions helped you get your instance of RabbitMQ up and running!

References

OpsCenter – Setting up Authentication with Roles and Users

DataStax OpsCenter is a handy tool. However, since it provides the user with a lot of operations that if done accidentally could be very destructive (i.e., truncate table), it is a very good idea that when you install OpCenter, you immediately do three things:

  • Enable Authentication
  • Change the admin password
  • Create user accounts with restricted permissions for different types of roles (i.e., developer, manager, etc.)

DataStax has very thorough documentation on how to enable authentication and setup rolls and users, however I just wanted to make a quick start guide that walks you through these three common steps.

Enable Authentication

To enable authentication you will need to edit the OpsCenter configuration file. Login to your OpsCenter server and edit the config file.

vi /etc/opscenter/opscenterd.conf

In the authentication section of the config file change the setting for “enabled = False” to True.

[athentication]
enabled = True

For the change to take effect you will need to restart the OpsCenter service.

systemctl restart opscenterd

Once the application is back up you will be able to login using the default credentials.

Change the Admin Password

When the application comes back up, you will be able to login using the default admin credentials.

  • Username – admin
  • Password – admin

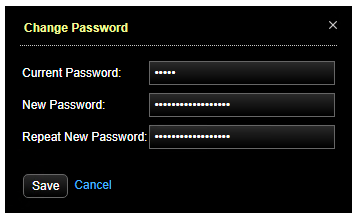
Go to “admin → Change Password“.

Now create a new password for the admin user.

Create a New Role and User

Since the “admin” user has unrestricted permissions, you probably don’t want everyone logging in to OpsCenter with that level of access.

In OpsCenter it has the concept of Roles and Users.

  • Role – Is a defined set of permissions
  • User – Is a login that is mapped to a Role

So for this example let’s create a new role and user account for a developer with a reduced set permissions.

Create Role

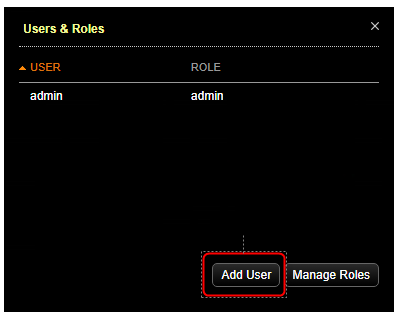
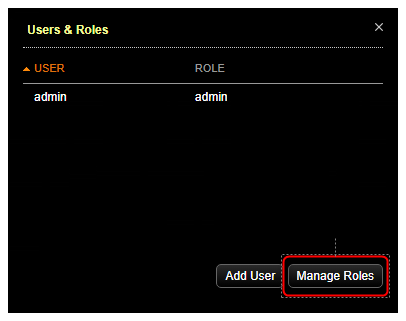
To add a new role go to “Settings → Users & Roles“.

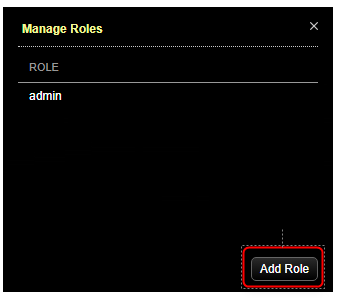
Click on “Manage Roles”.

Click on “Add Role”.

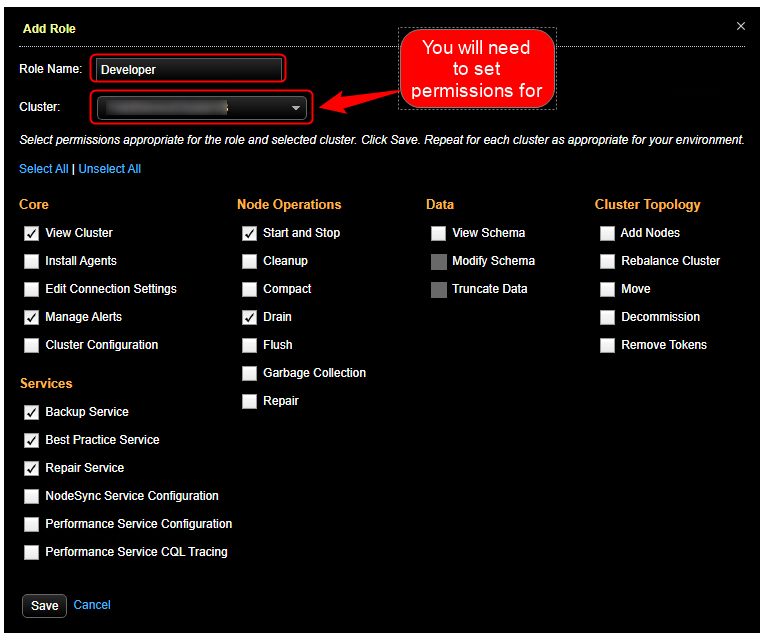
Create the new role “Developer“.

Note: You will need to set permissions on a per cluster basis. So you will need to repeat the permissions selection for each cluster.

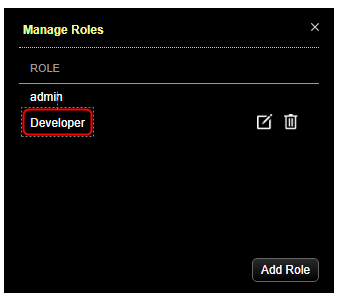
After saving your changes, you should see a new role called “Developer” on the “Manage Roles” page.

Create User

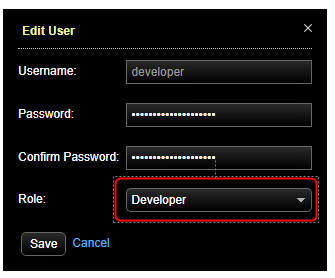
Now that we have created our new “Developer” role, let’s create a new user from the “Settings → User & Roles” page by clicking the “Add User” button.

Create a new user called “developer” and in the “Role” drop down list make sure to select the role “Developer“.

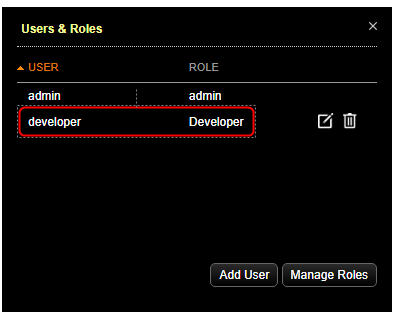
After clicking “Save” you should see your new “developer” user account.

You will now be able to login with your new “developer” user account.

I hope that helps!

References

Redis – How to Setup a Six Node Redis Test Cluster in Ubuntu on Windows 10

I work on several applications that use Redis. In production those applications all use six node Redis clusters that run on Linux. However, my developer workstation is a Windows 10 machine on which I only have a single node instance of Redis running. I really wanted to have a six node Redis cluster to test against in my Windows 10 development environment, the problem is that the utilities that come with Redis that allow you to setup a multiple node test cluster on a single machine, are all written to work on Linux.

Since I can’t do anything about the fact that my workstation is a Windows 10 machine, it turns out the solution was quite simple, use the Ubuntu subsystem.

In this article I will walk you through setting up a six node Redis test cluster running on Windows 10 using the Ubuntu subsystem.

Install Ubuntu Subsystem

The first step is to go to the Windows Store, search for Ubuntu, and when you find the latest version of the Ubuntu App install it:

Once the Ubuntu subsystem is installed, you can launch the app from the windows start menu by typing “Ubuntu”:

Install Redis on Ubuntu

Fix SSL Issue

One issue you may run into when trying to download Ruby packages from within the Ubuntu subsystem is an SSL issue. The solution is to run the following commands:

First, remove the source if it exists:

gem sources -r https://rubygems.org/

Second, add the source again but with “http”:

gem sources -a http://rubygems.org/

Install Redis

Ensure all packages are up to date:

apt-get update

Install Ruby:

apt-get install ruby

Download Redis:

wget https://download.redis.io/releases/redis-5.0.12.tar.gz --no-check-certificate

Unzip the package into the /opt folder:

tar -zxvf redis-5.0.12.tar.gz /opt

Navigate to the Redis folder:

cd /opt/redis-5.0.12

Build the Redis executable:

apt install make

apt install make-guile

apt install gcc

apt install build-essential

make MALLOC=libc 

apt install redis-tools

Create Redis Cluster

Navigate to the “create-cluster” folder:

cd /opt/redis-5.0.12/utils/create-cluster

Edit the “create-cluster” script:

vi create-cluster

Modify the cluster start port from “PORT=30000” to be “PORT=7000”:

#!/bin/bash

# Settings
PORT=7000
TIMEOUT=2000
NODES=6
REPLICAS=1

Note: This is a personal preference, to have the starting port set to 7000, so it is up to you if you want to change it or not.

Start the six nodes:

./create-cluster start

When the six nodes are started, the ports 7001 to 7006 will be used.

Starting 7001
Starting 7002
Starting 7003
Starting 7004
Starting 7005
Starting 7006

Now we are ready to configure the six nodes as a cluster.

Create the cluster:

./create-cluster create

You should see the following output as the cluster configuration is generated:

>>> Performing hash slots allocation on 6 nodes...
Master[0] -> Slots 0 - 5460
Master[1] -> Slots 5461 - 10922
Master[2] -> Slots 10923 - 16383
Adding replica 127.0.0.1:7005 to 127.0.0.1:7001
Adding replica 127.0.0.1:7006 to 127.0.0.1:7002
Adding replica 127.0.0.1:7004 to 127.0.0.1:7003
>>> Trying to optimize slaves allocation for anti-affinity
[WARNING] Some slaves are in the same host as their master
M: cf10723420c411b32ebcd7a50a724fa1bb00add0 127.0.0.1:7001
   slots:[0-5460] (5461 slots) master
M: f563c0cc983f181d8fde839f3508d52f1905b96e 127.0.0.1:7002
   slots:[5461-10922] (5462 slots) master
M: 36f2de71920d07030b93e4e1bd7c49afc1a26276 127.0.0.1:7003
   slots:[10923-16383] (5461 slots) master
S: fd872ad38d305ab067a86eacc33775b362feed0e 127.0.0.1:7004
   replicates f563c0cc983f181d8fde839f3508d52f1905b96e
S: 3115b82336b10f57de1a6936cff93a8e45df777f 127.0.0.1:7005
   replicates 36f2de71920d07030b93e4e1bd7c49afc1a26276
S: 17bb709ba3af5311e44fc408d3f44979bae1f1dc 127.0.0.1:7006
   replicates cf10723420c411b32ebcd7a50a724fa1bb00add0

You will be prompted to accept the configuration that is displayed, if everything looks correct answer “yes”

Can I set the above configuration? (type 'yes' to accept): yes

Then you should see the following output as the cluster configuration is applied:

>>> Nodes configuration updated
>>> Assign a different config epoch to each node
>>> Sending CLUSTER MEET messages to join the cluster
Waiting for the cluster to join
.
>>> Performing Cluster Check (using node 127.0.0.1:7001)
M: cf10723420c411b32ebcd7a50a724fa1bb00add0 127.0.0.1:7001
   slots:[0-5460] (5461 slots) master
   1 additional replica(s)
S: 17bb709ba3af5311e44fc408d3f44979bae1f1dc 127.0.0.1:7006
   slots: (0 slots) slave
   replicates cf10723420c411b32ebcd7a50a724fa1bb00add0
M: 36f2de71920d07030b93e4e1bd7c49afc1a26276 127.0.0.1:7003
   slots:[10923-16383] (5461 slots) master
   1 additional replica(s)
S: 3115b82336b10f57de1a6936cff93a8e45df777f 127.0.0.1:7005
   slots: (0 slots) slave
   replicates 36f2de71920d07030b93e4e1bd7c49afc1a26276
S: fd872ad38d305ab067a86eacc33775b362feed0e 127.0.0.1:7004
   slots: (0 slots) slave
   replicates f563c0cc983f181d8fde839f3508d52f1905b96e
M: f563c0cc983f181d8fde839f3508d52f1905b96e 127.0.0.1:7002
   slots:[5461-10922] (5462 slots) master
   1 additional replica(s)
[OK] All nodes agree about slots configuration.
>>> Check for open slots...
>>> Check slots coverage...
[OK] All 16384 slots covered.

The cluster should now be configured and running.

You can view the list of nodes in the cluster by running the following command:

redis-cli -p 7001 cluster nodes
17bb709ba3af5311e44fc408d3f44979bae1f1dc 127.0.0.1:7006@17006 slave cf10723420c411b32ebcd7a50a724fa1bb00add0 0 1625887492326 6 connected
36f2de71920d07030b93e4e1bd7c49afc1a26276 127.0.0.1:7003@17003 master - 0 1625887492326 3 connected 10923-16383
3115b82336b10f57de1a6936cff93a8e45df777f 127.0.0.1:7005@17005 slave 36f2de71920d07030b93e4e1bd7c49afc1a26276 0 1625887492126 5 connected
cf10723420c411b32ebcd7a50a724fa1bb00add0 127.0.0.1:7001@17001 myself,master - 0 1625887492000 1 connected 0-5460
fd872ad38d305ab067a86eacc33775b362feed0e 127.0.0.1:7004@17004 slave f563c0cc983f181d8fde839f3508d52f1905b96e 0 1625887492025 4 connected
f563c0cc983f181d8fde839f3508d52f1905b96e 127.0.0.1:7002@17002 master - 0 1625887492025 2 connected 5461-10922

That is it, the cluster is now ready!

Useful Cluster Commands

Here are some common commands you will use when working with your new Redis cluster.

Starting a cluster

Here is the start cluster command:

./create-cluster start

When the cluster is started successfully you should see the following output:

root@mycomputer:/opt/redis-5.0.12/utils/create-cluster# ./create-cluster start
Starting 7001
Starting 7002
Starting 7003
Starting 7004
Starting 7005
Starting 7006

Stopping a cluster

Here is the stop cluster command:

./create-cluster stop

When the cluster is stopped you should see the following output:

root@mycompouter:/opt/redis-5.0.12/utils/create-cluster# ./create-cluster stop
Stopping 7001
Stopping 7002
Stopping 7003
Stopping 7004
Stopping 7005
Stopping 7006

Removing a cluster

If you need to remove the existing cluster for some reason you can run the following command:

./create-cluster clean

References

RabbitMQ – How to join a node to a cluster when you get the error: incompatible_feature_flags

If you are reading this post it is because you have received the dreaded incompatible_feature_flags error when trying to join an upgraded node or a newly created node to an existing RabbitMQ cluster.

I will describe the scenario that got me into this situation and the solution I used to resolve it.

Scenario

I have a three node RabbitMQ cluster running on CentOS. The existing three nodes are running version 3.8.3, but I wanted to upgrade to version 3.8.14. Now, these two RabbitMQ versions require different versions of Erlang, so Erlang must be upgraded from 22+ to 23+.

When BOTH versions of RabbitMQ use the SAME version of Erlang, the RabbitMQ installer will just do a normal upgrade, carrying forward settings, such as feature flags, cluster configuration, from the previous install.

However, when the version of Erlang needs to be upgraded, you cannot just upgrade RabbitMQ, instead you must:

  • Uninstall RabbitMQ
  • Upgrade Erlang
  • Reinstall RabbitMQ

On a new install of RabbitMQ, it by default enables ALL feature flags.

The documentation does provide you with a config option called forced_feature_flags_on_init to override the list of enabled feature flags, however this option only works if set BEFORE starting RabbitMQ on the node for the very first time. After you have already started RabbitMQ for the first time, it will have no effect.

Here is what you will find in the RabbitMQ documentation on How To Disable Feature Flags:

Also if you try to uninstall and reinstall RabbitMQ thinking that will give you a clean slate, it will not. The uninstall does not remove the local RabbitMQ database which is where the enabled feature flag settings are stored.

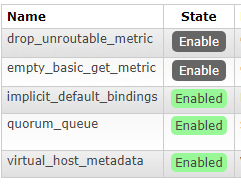
So basically I am stuck in this scenario where my existing nodes have the feature flags:

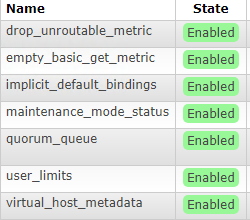
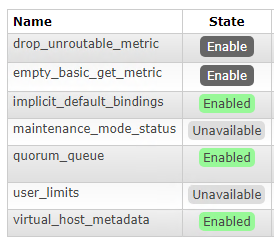
But my upgrade node has the feature flags:

So when I try to join my upgraded node to the cluster I get the error:

[root@node333 ~]# rabbitmqctl stop_app
Stopping rabbit application on node node333@node333 ...
[root@node333 ~]# rabbitmqctl join_cluster node111@node111
Clustering node node333@node333 with node111@node111
Error:
incompatible_feature_flags

But do not worry, I have a solution that worked!

Solution

The following is a step by step solution that worked for me to solve the incompatible feature flags issue.

For this example let’s say we have three nodes:

  • node111
  • node222
  • node333 – This is the node being upgraded

On an Existing Node in the Cluster

Ensure the upgraded node has been removed from the cluster

rabbitmqctl forget_cluster_node <ID of upgraded node>

Get the list of enabled feature flags

rabbitmqctl list_feature_flags

The output should look like:

[root@node111 ~]# rabbitmqctl list_feature_flags
Listing feature flags ...
name                        state
drop_unroutable_metric      disabled
empty_basic_get_metric      disabled
implicit_default_bindings   enabled
quorum_queue                enabled
virtual_host_metadata       enabled

So out of this list the only feature flags enabled are:

  • implicit_default_bindings
  • quorum_queue
  • virtual_host_metadata

Note: We will need this list later when we configure the list of feature flags to enable on the node being upgraded

On The Node That Was Upgraded

Uninstall RabbitMQ

yum remove rabbitmq-server-*

Remove the RabbitMQ lib directory

rm -rf /var/lib/rabbitmq

Remove the RabbitMQ config directory

rm -rf /etc/rabbitmq

Reinstall RabbitMQ

yum install rabbitmq-server <Version To Install>

Important: Before we start the new node, we need to update the initial set of feature flags to enable on startup.

Edit the rabbitmq.config file

vi /etc/rabbitmq/rabbitmq.config

Add our list of enabled feature flags to a forced_feature_flags_on_init entry in the config which should look like:

{forced_feature_flags_on_init, [quorum_queue, implicit_default_bindings, virtual_host_metadata]}]

So when you are done, your rabbitmq.config file should look something like this:

[
  {rabbit, [
    {default_user, <<"guest">>},
    {default_pass, <<"r@bb1t">>},
    {collect_statistics_interval, 10000},
    {forced_feature_flags_on_init, [quorum_queue, implicit_default_bindings, virtual_host_metadata]}
  ]}
].

Start RabbitMQ

systemctl start rabbitmq-server

Verify we have the correct set of feature flags enabled

rabbitmqctl list_feature_flags

The output should look something like:

[root@node333 ~]# rabbitmqctl list_feature_flags
Listing feature flags ...
name                        state
drop_unroutable_metric      disabled
empty_basic_get_metric      disabled
implicit_default_bindings   enabled
maintenance_mode_status     disabled
quorum_queue                enabled
user_limits                 disabled
virtual_host_metadata       enabled

Notice that only the three feature flags we wanted enabled, are enabled, so we should be fine now to join our node to the cluster again.

Also if you check the RabbitMQ management console on the new node you should see the feature flags as well:

Join the upgraded node to the cluster

rabbitmqctl stop_app
rabbitmqctl join_cluster  <ID of existing node>
rabbitmqctl start_app

If everything is successful, the output should look something like:

[root@node333 rabbitmq]# rabbitmqctl stop_app
Stopping rabbit application on node node333@node333 ...
[root@node333 rabbitmq]# rabbitmqctl join_cluster node111@node111
Clustering node node333@node333 with node111@node111
[root@node333 rabbitmq]# rabbitmqctl start_app
Starting node node333@node333 ...
[root@node333 rabbitmq]#

We have now successfully joined our new node running version 3.8.14 to our cluster of nodes running version 3.8.3.

So when you upgrade the rest of the nodes make sure to set the rabbitmq.config entry forced_feature_flags_on_init on each node AFTER upgrading but BEFORE starting it for the first time and save yourself all this trouble!

I hope that helps!

RabbitMQ – How to do a Rolling upgrade in a Cluster (Version 3.8+)

Recently I had the task of upgrading several RabbitMQ clusters that were each running at least version 3.8 of RabbitMQ. We wanted to roll out each upgrade with no downtime. Overall, the documentation provided by RabbitMQ on Upgrading, Rolling Upgrades, and Feature Flags is generally pretty good.

The problem in the documentation is it mostly covers upgrades where ONLY RabbitMQ is being upgraded, but the version of Erlang stays the same. The following is a summary of the steps I used to upgrade RabbitMQ in a cluster both when an Erlang change was and was not required.

Note: The following examples were created using a cluster of three RabbitMQ servers running on CentOS.

Upgrade when No Erlang Change Required

Upgrade steps when Erlang version is compatible with BOTH RabbitMQ versions.

Scenario

Let’s say, for example we have the following upgrade scenario:

Current install:

  • RabbitMQ: 3.8.12
  • Erlang: 23.2.3

Upgrading to:

  • RabbitMQ: 3.8.14
  • Erlang: 23.2.3

Note: Notice that both versions of RabbitMQ are compatible with the same version of Erlang.

When both the current version of RabbitMQ and the version you want to upgrade to are compatible with the same version of Erlang, then an upgrade is very straight forward. RabbitMQ will simply update the existing RabbitMQ install and carry forward existing settings, such as feature flags and cluster information, when performing an upgrade.

Upgrade Steps

Execute the following steps on each node, upgrading one node at a time:

Stop RabbitMQ

systemctl stop rabbitmq-server

Upgrade your version of RabbitMQ

yum install rabbitmq-server 3.8.14-1.e17

Start RabbitMQ

systemctl start rabbitmq-server

That should be it. Just repeat these steps on each node in the cluster until all nodes are upgraded.

When the Erlang version already in use is compatible with the version of RabbitMQ you are upgrading to, it is a very simple procedure. The RabbitMQ installer treats the install as an upgrade and carries forward all existing settings, such as feature flags, cluster information, etc.

Note: At the time I wrote this article, we were not yet using the Maintenance Mode feature flag, so I have not included the step to drain the node, however it is highly recommended!

Upgrade when Erlang Change Required

Upgrade steps when the version of RabbitMQ we are upgrading to also requires a newer version of Erlang than what is currently installed.

Scenario

Let’s say, for example we have the following upgrade scenario:

Current install:

  • RabbitMQ: 3.8.3
  • Erlang: 22.1.6

Upgrading to:

  • RabbitMQ: 3.8.14
  • Erlang: 23.2.3

Note: Notice that we need to upgrade from Erlang 22+ to Erlang 23+ since RabbitMQ 3.8.14 is not compatible with Erlang version 22+. You can verify the version of Erlang you need using the RabbitMQ Erlang Compatibility Guide.

An Erlang version change requires all apps dependent on that version be uninstalled. So we have to:

  • uninstall RabbitMQ
  • upgrade Erlang
  • reinstall RabbitMQ

Issues with Erlang Change

The problem with this upgrade scenario is that it makes the RabbitMQ installer treat it as a brand new install, not an upgrade, so no settings from the current install, such as feature flags, cluster information, will be carried forward.

Feature Flags

On a new install, RabbitMQ by default enables ALL feature flags, so you will need to adjust the feature flags on the upgraded node to match the ones on your existing nodes to ensure the upgraded node can be successfully rejoined to the cluster.

Cluster Information

Since we had to uninstall RabbitMQ and reinstall it, it is now a brand new node and will have lost it’s cluster configuration. When RabbitMQ starts up it will now be running as a standalone node. However, the cluster still thinks the node exists and is just down, but since the node is no longer part of a cluster, even when you start the node up, it will not be able to rejoin as a node in the existing cluster.

Additional Steps

As a result you will need to do some additional steps which include:

  • Remove the node being upgraded from the cluster and join it back after the upgrade is complete
  • Configure feature flags on the upgraded node to enable ONLY ones enabled on other nodes in the cluster

Upgrade Steps

Execute the following steps on each node, one at a time:

On Any Node In The Cluster

Get the ID’s for all the nodes in the cluster

rabbitmqctl cluster_status

In the output there should be a section called Running Nodes which has the ID’s for all nodes in the cluster

Running Nodes

upgradenode@upgradenode
existingnode@existingnode
someothernode@someothernode

In this first pass we will be upgrading the node with the ID upgradenode@upgradenode.

Get list of enabled feature flags

rabbitmqctl list_feature_flags

The output should look something like this:

[root@existingnode ~]# rabbitmqctl list_feature_flags
Listing feature flags ...
name                        state
drop_unroutable_metric      disabled
empty_basic_get_metric      disabled
implicit_default_bindings   enabled
quorum_queue                enabled
virtual_host_metadata       enabled

So out of this list the only feature flags enabled are:

  • implicit_default_bindings
  • quorum_queue
  • virtual_host_metadata

Note: We will need this list later when we configure the list of feature flags to enable on the node being upgraded

On A Node Not Being Upgraded

Remove the node we are going to upgrade from the cluster

rabbitmqctl forget_cluster_node <ID of node being upgraded>

On The Node Being Upgraded

Stop RabbitMQ

systemctl stop rabbitmq-server

Uninstall RabbitMQ

yum remove rabbitmq-server-*

Uninstall Erlang

yum remove erlang-*

Install the new version of Erlang

yum install erlang 23.2.3-1.el7

Install the new version of RabbitMQ

yum install rabbitmq-server 3.8.14-1.e17

Important: Before we start the new node, we need to update the initial set of feature flags to enable on startup.

Edit the rabbitmq.config file

vi /etc/rabbitmq/rabbitmq.config

Add our list of enabled feature flags to a forced_feature_flags_on_init entry in the config which should look like:

{forced_feature_flags_on_init, [quorum_queue, implicit_default_bindings, virtual_host_metadata]}]

So when you are done, your rabbitmq.config file should look something like this:


[
  {rabbit, [
    {default_user, <<"guest">>},
    {default_pass, <<"r@bb1t">>},
    {collect_statistics_interval, 10000},
    {forced_feature_flags_on_init, [quorum_queue, implicit_default_bindings, virtual_host_metadata]}
  ]}
].

Start RabbitMQ

systemctl start rabbitmq-server

Verify we have the correct set of feature flags enabled

rabbitmqctl list_feature_flags

The output should look something like:

[root@upgradenode ~]# rabbitmqctl list_feature_flags
Listing feature flags ...
name                        state
drop_unroutable_metric      disabled
empty_basic_get_metric      disabled
implicit_default_bindings   enabled
maintenance_mode_status     disabled
quorum_queue                enabled
user_limits                 disabled
virtual_host_metadata       enabled

Notice that only the three feature flags we wanted enabled, are enabled, so we should be fine now to join our node to the cluster again.

Join node to cluster

rabbitmqctl stop_app
rabbitmqctl join_cluster  <ID of existing node>
rabbitmqctl start_app

If everything is successful, the output should look something like:

[root@upgradenode rabbitmq]# rabbitmqctl stop_app
Stopping rabbit application on node upgradenode@upgradenode ...
[root@upgradenode rabbitmq]# rabbitmqctl join_cluster existingnode@existingnode
Clustering node upgradenode@upgradenode with existingnode@existingnode
[root@upgradenode rabbitmq]# rabbitmqctl start_app
Starting node upgradenode@upgradenode ...
[root@upgradenode rabbitmq]#

You have now successfully upgraded a node and joined it back into the cluster! You can now repeat these steps on each node until the entire cluster has been upgraded.

I hope that helps!

Resources

Cassandra – Recovering Deleted Data with SSTabledump

If you accidentally delete a small amount of data from a single partition, you have a window of opportunity to recover that data before it is permanently removed. Since Cassandra is an immutable database, meaning data files are never updated, instead your delete is written to the database in a new file as a Tombstone, then later combined using a process called compaction, until that compaction occurs, the data you deleted still exists in an SSTable file on disk. For this reason you have a window of opportunity where you can recover your deleted data before it is removed by compactions.

Cassandra comes with a command line tool called SSTabledump which allows you to take a Cassandra SSTable file and output the data as JSON. This tool also allows you to filter by a partition key when processing a database file, so only data related to that key is output to JSON.

Recovering the Deleted Date

For this example let’s assume we have a 6 node cluster with a replication factor of 3 which has the keyspace=mykeyspace, table=mytable, and partition key=12345. Before the data had been accidentally deleted, here is what it would have looked like in CQLSH.

root@222.222.222.222:/tmp$ cqlsh
Connected to Test Cluster at 127.0.0.1:9042.
[cqlsh 5.0.1 | DSE 5.1.20 | CQL spec 3.4.4 | DSE protocol v1]
Use HELP for help.
cqlsh> use mykeyspace;
cqlsh:mykeyspace> select * from mytable where id = 12345;

 id     | name
--------+-------------
  12345 | Example One

(1 rows)

After the data has been deleted, it will no longer be queryable from CQLSH, however the data still exists in SSTables on disk, so in the following steps we will recover that data.

Step 1 – Find Nodes with the Partition

Since Cassandra is a distributed database, if we have a replication factor of three, then only three nodes in the cluster will have our partition key.

To find out which nodes have your partition key we can use the command  nodetool getendpoints.

Here is the usage for the command:

nodetool getendpoints <keyspace> <table> <partitionkey>

For this example lets use the following values:

  • keyspace = mykeyspace
  • table = mytable
  • partition key = 12345

Then the command will look like:

nodetool getendpoints mykeyspace mytable 12345

Which given a six node cluster with a replication factor of three, will return the IP addresses of the three nodes responsible for that partition key:

root@111.111.111.111:/tmp$ nodetool getendpoints mykeyspace mytable 12345
222.222.222.222
333.333.333.333
444.444.444.444 

Now that we know which nodes are responsible for that partition key, we can pick one of the nodes and try to recover the data with SSTabledump.

Step 2 – Create Script to Extract JSON data from SSTables

To recover the data you would login to one of the nodes that has your partition key (ie: 222.222.222.222), move to the folder for the keyspace and table you want to recover data from, then run the SSTabledump command on each Data.db file until you find the data you want.

However, since it is a bit tedious to run the SSTabledump command manually against each SSTable file one at a time, I have written a bash script that given the Cassandra directory for the table, will loop through the SSTables and only output JSON for ones where the partition key is found.

Copy this script into a file called sstabledump_helper.sh on one of the nodes that has your data:

#!/bin/bash

if [ $# -lt 2 ]
then
        echo "Usage: $0 table_directory partition_key"
        exit 1
fi

dir=$1

partition_key=$2

pattern="${dir}/*-Data.db"

temp_file="sstabletemp.json"

echo "Directory=${dir}"
echo "Partition Key=${partition_key}"

for file in $pattern; do
        filename="${file##*/}"
        echo "Checking file ${filename} ...";
        sstabledump $file -k $partition_key > sstabletemp.json
        if [ -s "$temp_file" ]
        then
                echo "Found data for partition key ${partition_key} in file ${filename}"
                data_filename="${filename%%.*}"
                output_filename="dump-${partition_key}-${data_filename}.json"
                mv $temp_file $output_filename
                echo "Dump saved to: ${output_filename}"
        fi
done

if [ -e $temp_file ]
then
        rm $temp_file
fi

Change permissions on the script to make it executable:

chmod 755 sstabledump_helper.sh

Step 3 – Dump Deleted Data to JSON Files

Here is the usage for the script:

sstabledump_helper.sh <cassandra_table_directory> <partition_key> 

Now let’s try and run the script for partition key 12345.

The parameters we will use for the script are:

  • cassandra_table_directory = /var/lib/cassandra/data/mykeyspace/mytable-a3b0ba20a47111eb875b2b24e92373f8 
  • partition_key = 12345
./sstabledump_helper.sh /var/lib/cassandra/data/mykeyspace/mytable-a3b0ba20a47111eb875b2b24e92373f8 12345

The output from the script should look like:

Directory=/var/lib/cassandra/data/mykeyspace/mytable-a3b0ba20a47111eb875b2b24e92373f8
Partition Key=12345
Checking file md-1-big-Data.db ...
Found data for partition key 12345 in file md-1-big-Data.db
Dump saved to: dump-12345-md-1-big-Data.json

Now if you look at the output file created:

cat dump-12345-md-1-big-Data.json

You should see the JSON output with your data:

[
  {
    "partition" : {
      "key" : [ "12345" ],
      "position" : 0
    },
    "rows" : [
      {
        "type" : "row",
        "position" : 35,
        "liveness_info" : { "tstamp" : "2021-04-23T20:26:07.745260Z" },
        "cells" : [
          { "name" : "name", "value" : "Example One" }
        ]
      }
    ]
  }
]

I hope that helps!

Cassandra – How to Run DataStax Enterprise in Ubuntu on Windows 10

Previously I had been working with open source Apache Cassandra, but now I mostly work with DataStax Enterprise (DSE) Cassandra. The one downside is that since my developer workstation is Windows 10, only Apache Cassandra is supported on Windows, while DSE Cassandra is not.

In the past when I had Linux only software I wanted to run on my workstation, I typically used a VM, usually running Virtual Box. However, after trying out the Ubuntu Subsystem and installing DSE Cassandra in it, we found it to be a much more convenient way of running DSE Cassandra locally.

The following instructions are just a summary of information I put together from multiple sources to get DSE Cassandra working for me, which includes work arounds for several little gotchas, so I hope this saves you some time!

Note: At the time I wrote these instructions I was using the following versions:

  • DSE – 5.1.22
  • Ubuntu Subsystem – 20.04 LTS

Setup DSE in Ubuntu Subsystem

Install Ubuntu Subsystem

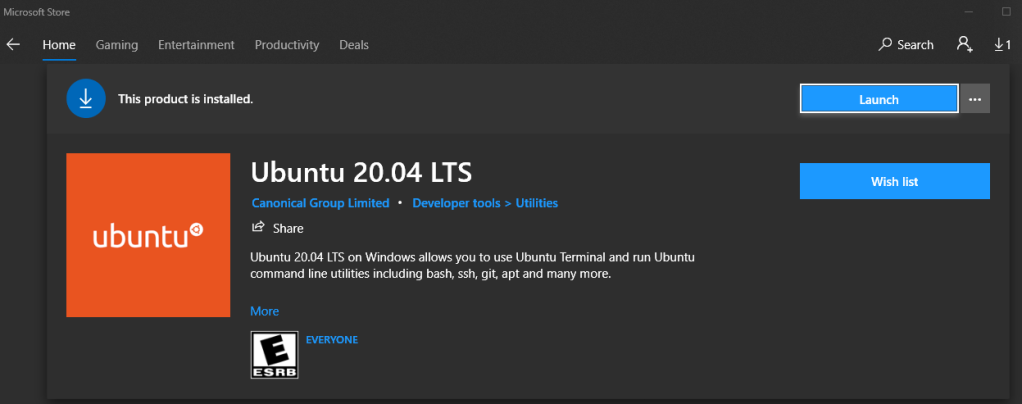
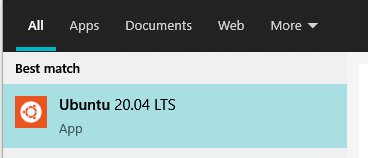
From the Microsoft Store in Windows 10, select and install a version of Ubuntu, such as:

Once installed, from the Windows Start menu type “Ubuntu” and open the app.

A Ubuntu command prompt will be opened, which you will use for the rest of these instructions.

Install Java

DSE 5+ requires Java 8, so you will need to ensure you have Java 8 installed.

Install OpenJdk 8:

sudo apt-get install openjdk-8-jdk

Add JAVA_HOME environment variable:

export JAVA_HOME=/usr/bin/java

Deal with Certificate Issue

Before you start you will need to deal with a certificate issue that will cause problems when apt-get tries to download packages from the DataStax repository.

Edit the following file:

vi /etc/apt/apt.conf.d/apt.conf

Now paste in the following code:

// Do not verify peer certificate
Acquire::https::Verify-Peer "false";
// Do not verify that certificate name matches server name
Acquire::https::Verify-Host "false";

Install DSE Cassandra

Now you can start installing DSE Cassandra. If you want more details you can refer to the official instructions, however all the steps you will need are in the summary below.

Add the DataStax repository so apt-get can download the packages from DataStax.

echo "deb https://debian.datastax.com/enterprise stable main" | sudo tee -a /etc/apt/sources.list.d/datastax.sources.list

Add the repository key.

Note: you will need to ignore the SSL cert check with option -k.

curl -k -L https://debian.datastax.com/debian/repo_key | sudo apt-key add -

Run an apt-get update to make sure all packages are up to date before installing DSE.

sudo apt-get update

Now run the install with apt-get.

sudo apt-get install dse=5.1.22-1 \
    dse-full=5.1.22-1 \
    dse-libcassandra=5.1.22-1 \
    dse-libgraph=5.1.22-1 \
    dse-libhadoop2-client-native=5.1.22-1 \
    dse-libhadoop2-client=5.1.22-1 \
    dse-liblog4j=5.1.22-1 \
    dse-libsolr=5.1.22-1 \
    dse-libspark=5.1.22-1 \
    dse-libtomcat=5.1.22-1

Update the max_map_count setting.

Note: If you do not do this step you will encounter errors when trying to start DSE.

Edit the following file:

vi /etc/sysctl.conf

Add the following line:

vm.max_map_count = 1048575

Run DSE Cassandra

Start DSE.

sudo service dse start

Verify the service has started.

sudo service dse status

You should see the following output if DSE is running.

 * dse is running

As DSE is starting you can tail the logs.

tail -f /var/log/cassandra/debug.log

If you see the following output then DSE has finished the startup process and is ready to use.

INFO  [main] 2021-04-23 10:05:19,264  DseDaemon.java:872 - DSE startup complete.

You can also use the admin tool nodetool to verify the health of Cassandra.

nodetool status

If everything is good, on the far right side you will see the status and the state noted by two letters:

  • U – Is the status, which is “Up
  • N – Is the state, which is “Normal
Datacenter: Cassandra
=====================
Status=Up/Down
|/ State=Normal/Leaving/Joining/Moving/Stopped
--  Address    Load       Owns (effective)  Host ID                               Token                    Rack
UN  127.0.0.1  272.77 KiB  100.0%            192bc33a-5dbf-4aba-984a-f2388d3496fa  -1965318375701162027    rack1

Connect to DSE Cassandra

Now that we have Cassandra running in our Ubuntu subsystem, the best way to verify everything is working properly is to connect to Cassandra from an application.

First let’s create a new Keyspace and table.

From your Ubuntu command prompt type the command CQLSH to open a query shell.

cqlsh

You should see the following output if the query shell has been opened successfully.

Connected to Test Cluster at 127.0.0.1:9042.
[cqlsh 5.0.1 | DSE 5.1.20 | CQL spec 3.4.4 | DSE protocol v1]
Use HELP for help.
cqlsh>

Create a new keyspace by executing the following query in your CQLSH shell.

CREATE KEYSPACE UbuntuExample 
WITH REPLICATION = { 'class' : 'NetworkTopologyStrategy', 'Cassandra' : 1 };

Switch to the new keyspace with the USE command.

USE UbuntuExample;

Create a table to store some data.

CREATE TABLE examples (
 id int,
 name text,
 PRIMARY KEY(id)
);

Insert a row into the table.

INSERT INTO examples(id,name) VALUES (1,'Example One');

Verify the new row has been added with a select.

SELECT * FROM examples WHERE id = 1;

You should see the following output.

cqlsh:ubuntuexample> SELECT * FROM examples WHERE id = 1;

 id | name
----+-------------
  1 | Example One

(1 rows)

Now let’s connect to Cassandra and run the same select statement using Python. I put together the following script from the DataStax Python Driver example. At the time when I created this example the current driver version was 3.25.

Install the Python Cassandra driver:

pip install cassandra-driver

Copy the following Python code into a file called “cassandra_example.py”.

from cassandra.cluster import Cluster

if __name__ == "__main__":
    cluster = Cluster(['localhost'], port=9042)
    session = cluster.connect('ubuntuexample')
    rows = session.execute('SELECT * FROM examples WHERE id = 1')
    for row in rows:
        print(row.name)

Run the script.

python cassandra_example.py

If our DSE Cassandra install was successful you should see the following response.

Example One

Summary

Overall I have found using the Ubuntu Subsystem to be very convenient for running DSE Cassandra on my developer workstation. I hope these instructions made it a little easier for you to get setup!

SQL Server – How to Create a Case Sensitive Column

By default all fields in SQL Server are case insensitive and almost all of the time that is no issue at all. However, if you run into that rare case, like I did, where a client was sending a unique identifier, but as we found out later, must be case sensitive, the following is a simple example showing how you can store case sensitive data in SQL Server.

You can download the example from GitHub here:

Case Sensitive Example

For this example we will be creating a table that stores our client provided identifier, which must be unique and case sensitive. Our table will have the following columns:

  • Id – An automatically generated identifier, other tables will use to foreign key to this table
  • ClientId – The client provided identifier
  • Name – A readable friendly name for each client

Create a Table

First let’s create our table:

CREATE TABLE [dbo].[CaseSensitiveExample](
	[Id] [bigint] NOT NULL IDENTITY(1,1),
	[ClientId] varchar(100) NOT NULL,
	[Name] varchar(100) NOT NULL,
 CONSTRAINT [PK_Id] PRIMARY KEY CLUSTERED 
(
  [Id] ASC
)) ON [PRIMARY]
GO

Let’s also add a unique constraint on the column ClientId, since it has to be unique and we want to ensure we do not insert a duplicate:

ALTER TABLE [dbo].[CaseSensitiveExample] 
ADD  CONSTRAINT [UC_CaseSensitiveExample_ClientId] UNIQUE NONCLUSTERED
(
  [ClientId] ASC
) ON [PRIMARY]
GO

Insert Client Data

Insert our first client:

INSERT INTO [dbo].[CaseSensitiveExample] ([ClientId], [Name])
VALUES('clientid', 'First Client')
GO

You can see the client has been added:

SELECT * FROM  dbo.CaseSensitiveExample
Id	ClientId	Name
---------------------------------------
1	clientid	First Client

Now let’s try and insert a second client:

INSERT INTO dbo.CaseSensitiveExample (ClientId, [Name])
VALUES('CLIENTID', 'Second Client')
GO

But rather than adding the row, you get the following exception:

Violation of UNIQUE KEY constraint 'UC_CaseSensitiveExample_ClientId'. 
Cannot insert duplicate key in object 'dbo.CaseSensitiveExample'.
The duplicate key value is (CLIENTID).

The problem is that column ClientId sees the identifier “clientid” and “CLIENTID” as being duplicates.

To fix this issue, we will alter the ClientId column to be case sensitive.

Alter Column ClientId to be Case Sensitive

First drop the unique constraint so we can alter the column:

ALTER TABLE [dbo].[CaseSensitiveExample] DROP [UC_CaseSensitiveExample_ClientId]
GO

Now let’s alter the column to be case sensitive by setting the collation type to be SQL_Latin1_General_CP1_CS_AS (Which is case sensitive) :

ALTER TABLE dbo.CaseSensitiveExample
ALTER COLUMN ClientId VARCHAR(100) COLLATE SQL_Latin1_General_CP1_CS_AS NOT NULL
GO

Add back our unique constraint:

ALTER TABLE [dbo].[CaseSensitiveExample]
ADD  CONSTRAINT [UC_CaseSensitiveExample_ClientId] UNIQUE NONCLUSTERED
(
  [ClientId] ASC
) ON [PRIMARY]
GO

Let’s Verify It Works!

Now insert the second client again:

INSERT INTO dbo.CaseSensitiveExample (ClientId, [Name])
VALUES('CLIENTID', 'Second Client')
GO

So now we should have two clients:

SELECT * FROM  dbo.CaseSensitiveExample
Id	ClientId	Name
--------------------------------------
1	clientid	First Client
3	CLIENTID	Second Client

Success!

Summary

In this example I used the collation type SQL_Latin1_General_CP1_CS_AS to make my column case sensitive, however the collation type I used might not work for your use case. You can view the list of all available collation types here.

I hope that helps!

SQL Server – Applying Schema Changes without Downtime

Over the years I have worked on many projects using SQL Server with applications in C#, Java, Python, and Scala. Even though the programming languages and libraries we use for managing migration scripts might change, the basic principles of how we write migration scripts for clustered applications using a SQL Server instance have remained the same.

There are very few occasions (if any) where a schema change to a database should require downtime, so in this article I have outlined step by step instructions on how to apply some of the more common types of schema changes without any need to take the database offline. Since I have been following these steps for years but never wrote them down anywhere, I finally decided to document them in this article. I hope this helps!
Why Backwards Compatible Schema Changes Matter

Anytime you are making a change to a SQL database such as adding a column, renaming a table, etc, you must always ensure your change is backwards compatible with the currently deployed version of the application for two reasons:

  1. Clustered Application. Our application runs in a clustered environment. So when the application is deployed, it will be deployed one node at a time which means there will be a short period of time where your new version of the application with the new version of the database will be running side-by-side with an older version of the application that is also running on the new version of the database
  2. Rolling Back. If the application deploy needs to be rolled back, we want to be in a state where the database changes added are backwards compatible with the previous version, to make rolling back the application not require undoing database changes. Thinking this way is important in a clustered environment, since if you started the rollback of your application one node at a time and rolled back your database changes, then your nodes running the newer version of the application would break until they had all been rolled back.

Common Migration Patterns

Note: In the steps for each of these patterns, I am assuming each script is being run automatically by some migration script management library (For example: Flyway) when you are releasing your application.

Rename a Table

Scenario: Rename an existing table while remaining backwards compatible

Pattern: Use a database synonym to maintain backwards compatibility with the old table name

Steps:

  1. Add script that renames the table and also creates a synonym
  2. Update code to use the new table name
  3. Release app
  4. Create an issue for a future sprint to drop the synonym 

Here is an example migration script that renames the table and creates a synonym:

IF EXISTS (
    SELECT * FROM INFORMATION_SCHEMA.TABLES 
    WHERE TABLE_SCHEMA = N'MySchema' AND TABLE_NAME = N'MyOldTable')
BEGIN
    EXEC sp_rename 'MySchema.MyOldTable', 'MyNewTable'; 
    CREATE SYNONYM MySchema.MyOldTable
    FOR MySchema.MyNewTable;
END
GO

In a future sprint create a script to drop the old synonym:

IF EXISTS(SELECT * FROM sys.synonyms WHERE name = 'MyOldTable')
BEGIN
    DROP SYNONYM [MySchema].[MyOldTable]
END
GO

Move a Table to a Different Schema

Scenario: Move an existing table to a different schema while remaining backwards compatible

Pattern: Use a database synonym to maintain backwards compatibility with the old schema name for the table

Steps:

  1. Add script that both moves the table to the new schema and also adds a synonym 
  2. Update code to use new schema name
  3. Release App
  4. Create an issue for a future sprint to drop the synonym

Here is an example migration script that changes the table schema and creates a synonym:

IF EXISTS (
    SELECT * FROM INFORMATION_SCHEMA.TABLES 
    WHERE TABLE_SCHEMA = N'MyOldSchema' AND TABLE_NAME = N'MyTable')
BEGIN
    ALTER SCHEMA MyNewSchema
    TRANSFER MyOldSchema.MyTable; 
    
    CREATE SYNONYM MyOldSchema.MyTable
    FOR MyNewSchema.MyTable;
END
GO

In a future sprint create a script to drop the old synonym:

IF EXISTS(SELECT * FROM sys.synonyms WHERE name = 'MyTable')
BEGIN
    DROP SYNONYM [MyOldSchema].[MyTable]
END
GO

Alter Columns Used in an Index

Scenario: Move an index from being on columns A and B to being on columns A and C while remaining backwards compatible

Pattern: Rather than altering the existing index, create a new index, then drop the old index in a future release

Steps:

  1. Add script to create a new index with the columns you want
  2. Update code to have queries use the new index (If needed)
  3. Release app
  4. Create an issue for a future sprint to drop the old index

Example script to add the new index:

IF NOT EXISTS(
    SELECT * FROM sys.indexes 
    WHERE name='IX_MySchema_MyTable_ColumnA_ColumnC')
BEGIN
    CREATE UNIQUE NONCLUSTERED INDEX IX_MySchema_MyTable_ColumnA_ColumnC
    ON [MySchema].[MyTable]([ColumnA],[ColumnC])
END
GO

In a future sprint, add a script to drop the old index:

IF EXISTS(
    SELECT * FROM sys.indexes 
    WHERE name='IX_MySchema_MyTable_ColumnA_ColumnB')
BEGIN
    DROP INDEX IX_MySchema_MyTable_ColumnA_ColumnB 
    ON [MySchema].[MyTable]
END
GO

Add a New Non-Nullable Column

Scenario: Add a new non-nullable column to an existing table where the table already has data while remaining backwards compatible

Pattern: Add the new column as nullable first, populate the data, then make it non-nullable later

Steps:

  1. Add script that adds the column as a new nullable column
  2. Update code to start writing to, but not reading from, this new column
  3. Release app
  4. Add script to backfill any rows where the column value is still null
  5. Add script to make the column non-nullable
  6. Update code to start reading from the new non-nullable column
  7. Release app

Example script to add the nullable column:

IF NOT EXISTS(
    SELECT * FROM sys.columns 
    WHERE Name = N'MyColumn' AND Object_ID = Object_ID(N'MySchema.MyTable'))
BEGIN
    ALTER TABLE MySchema.MyTable
    ADD [MyColumn] [uniqueIdentifier] NULL
END
GO

In a future sprint, once all rows in the table have this column populated:

ALTER TABLE [MySchema].[MyTable]
ALTER COLUMN MyColumn [uniqueIdentifier] NOT NULL
GO

Drop a Non-Nullable Column

Scenario: Drop a non-nullable column from an existing table while remaining backwards compatible

Pattern: Alter the column to make it nullable first, remove usages, then drop the column

Steps:

  1. Add script to make the existing column nullable
  2. Update code to stop reading from the column
  3. Release app
  4. Update code to stop writing to the column
  5. Release app
  6. Create an issue for a future sprint to drop the column

Example script to make the column nullable:

IF EXISTS(
    SELECT * FROM sys.columns 
    WHERE Name = N'MyColumn' AND Object_ID = Object_ID(N'MySchema.MyTable'))
BEGIN
    ALTER TABLE [MySchema].[MyTable]
    ALTER COLUMN MyColumn [uniqueIdentifier] NULL
END
GO

In a future sprint, once we will nolonger rollback to a version that references this column, add a script to drop it:

IF EXISTS(
    SELECT * FROM sys.columns 
    WHERE Name = N'MyColumn' AND Object_ID = Object_ID(N'MySchema.MyTable'))
BEGIN
    ALTER TABLE MySchema.MyTable
    DROP COLUMN [MyColumn]
END
GO

Rename a Non-Nullable Column

Scenario: Rename an existing non-nullable column while remaining backwards compatible

Pattern: Rather than altering the name of the existing column, add a new column with the name you want, populate the data, then drop the old column after all usages have been moved to the new column

Steps:

  1. Add script that adds the column as a new nullable column (it must be nullable temporarily)
  2. Update code to start writing to the new column, while still writing to and reading from the old column
  3. Release app
  4. Add script to copy all values from the old column to the new column
  5. Update code to start reading from the new column
  6. Release app
  7. Add script to make old column nullable
  8. Update code to stop writing to the old column
  9. Add script to make the new column non-nullable (now we can enforce the new column is non-nullable)
  10. Release app
  11. Create an issue for a future sprint to drop the old column

Example script to add the nullable column (Note, it must be nullable until we are writing to it and have migrated the old data):

IF NOT EXISTS(
    SELECT * FROM sys.columns 
    WHERE Name = N'NewColumn' AND Object_ID = Object_ID(N'MySchema.MyTable'))
BEGIN
    ALTER TABLE MySchema.MyTableADD [NewColumn] [varchar(100)] NULL
END
GO

Example script to copy the values from the old column to the new column:

NOTE: If the table has a lot of traffic, it may be a better approach to migrate the data using a cursor (Cursor Example):

UPDATE MySchema.MyTable
SET NewColumn = OldColumn
WHERE OldColumn IS NOT NULL AND NewColumn IS NULL

Example script to update the new column to be non-nullable (now that we have populated the data for the new column in all rows):

IF  EXISTS(
    SELECT * FROM sys.columns 
    WHERE Name = N'NewColumn' AND Object_ID = Object_ID(N'MySchema.MyTable'))
BEGIN
    ALTER TABLE MySchema.MyTable
    ALTER COLUMN [NewColumn] [varchar(100)] NOT NULL
END
GO

In a future sprint, once we will no longer rollback to a version that references the old column, add a script to drop it:

IF EXISTS(
    SELECT * FROM sys.columns 
    WHERE Name = N'OldColumn' AND Object_ID = Object_ID(N'MySchema.MyTable'))
BEGIN
    ALTER TABLE MySchema.MyTable
    DROP COLUMN [OldColumn]
END
GO

Summary

There are many types of schema change scenarios I did not touch on in this article. I just wanted to focus on the most common ones and show that for many types of schema changes there is always a way to do it that does not involve taking the database offline.

I hope that helps!